ディレクティブを実装しよう (v-bind)
方針
ここからは Vue.js の醍醐味であるディレクティブを実装していきます.
例の如く,ディレクティブも transformer に噛ませるのですが,そこで登場するのが DirectiveTransform というインタフェースです. DirectiveTransform は DirectiveNode,ElementNode を受け取り,Transform 後の Property を返すようなものになっています.
export type DirectiveTransform = (
  dir: DirectiveNode,
  node: ElementNode,
  context: TransformContext,
) => DirectiveTransformResult

export interface DirectiveTransformResult {
  props: Property[]
}
まずは今回目指す開発者インタフェースから確認してみましょう.
import { createApp, defineComponent } from 'chibivue'

const App = defineComponent({
  setup() {
    const bind = { id: 'some-id', class: 'some-class', style: 'color: red' }
    return { count: 1, bind }
  },

  template: `<div>
  <p v-bind:id="count"> v-bind:id="count" </p>
  <p :id="count * 2"> :id="count * 2" </p>

  <p v-bind:["style"]="bind.style"> v-bind:["style"]="bind.style" </p>
  <p :["style"]="bind.style"> :["style"]="bind.style" </p>

  <p v-bind="bind"> v-bind="bind" </p>

  <p :style="{ 'font-weight': 'bold' }"> :style="{ font-weight: 'bold' }" </p>
  <p :style="'font-weight: bold;'"> :style="'font-weight: bold;'" </p>

  <p :class="'my-class my-class2'"> :class="'my-class my-class2'" </p>
  <p :class="['my-class']"> :class="['my-class']" </p>
  <p :class="{ 'my-class': true }"> :class="{ 'my-class': true }" </p>
  <p :class="{ 'my-class': false }"> :class="{ 'my-class': false }" </p>
</div>`,
})

const app = createApp(App)

app.mount('#app')
v-bind には 概ね上記のような記法があります.詳しくは下記の公式ドキュメントを参照してください.
class や style についても今回取り扱います.
https://vuejs.org/api/built-in-directives.html#v-bind
AST の変更
まず,AST についてですが,今は exp, arg 共に string という簡易的なものになってしまっているので,ExpressionNode を受け取れるように変更します.
export interface DirectiveNode extends Node {
  type: NodeTypes.DIRECTIVE
  name: string
  exp: ExpressionNode | undefined // ここ
  arg: ExpressionNode | undefined // ここ
}
改めて name と arg と exp について説明しておくと, name は v-bind や v-on などのディレクティブ名です.on や bind が入ります. 今回は v-bind を実装していくので,bind が入ります.
arg は : で指定する引数です.v-bind でいうと, id や style などが入ります.
(v-on の場合は click や input などがここに入ってきます.)
exp は右辺です.v-bind:id="count" でいうと count が入ります.
exp も arg も,動的に変数を埋め込むことができるので,型は ExpressionNode になります.
( v-bind:[key]="count" のように arg も動的にできるので)

Parser の変更
parser の実装をこの AST の変更に追従します.exp, arg を SimpleExpressionNode としてパースします.
ついでに v-on などで使う @ やスロットで使う # などもパースします.
(正規表現を考えるのが面倒くさい(説明しながら徐々に追加するのが面倒臭い)のでとりあえず本家のものをそのまま拝借します)
参考: https://github.com/vuejs/core/blob/623ba514ec0f5adc897db90c0f986b1b6905e014/packages/compiler-core/src/parse.ts#L802
少し長いので,コード中にコメントを書きながら説明していきます.
function parseAttribute(
  context: ParserContext,
  nameSet: Set<string>,
): AttributeNode | DirectiveNode {
  // .
  // .
  // .
  // .
  // directive
  const loc = getSelection(context, start)
  // ここの正規表現は本家から拝借
  if (/^(v-[A-Za-z0-9-]|:|\.|@|#)/.test(name)) {
    const match =
      // ここの正規表現は本家から拝借
      /(?:^v-([a-z0-9-]+))?(?:(?::|^\.|^@|^#)(\[[^\]]+\]|[^\.]+))?(.+)?$/i.exec(
        name,
      )!

    // name 部分のマッチを見て、`:` で始まっていた場合には bind として扱う
    let dirName =
      match[1] ||
      (startsWith(name, ':') ? 'bind' : startsWith(name, '@') ? 'on' : '')

    let arg: ExpressionNode | undefined

    if (match[2]) {
      const startOffset = name.lastIndexOf(match[2])
      const loc = getSelection(
        context,
        getNewPosition(context, start, startOffset),
        getNewPosition(context, start, startOffset + match[2].length),
      )

      let content = match[2]
      let isStatic = true

      // `[arg]` のような動的な引数の場合、`isStatic` を false として、中身を content として取り出す
      if (content.startsWith('[')) {
        isStatic = false
        if (!content.endsWith(']')) {
          console.error(`Invalid dynamic argument expression: ${content}`)
          content = content.slice(1)
        } else {
          content = content.slice(1, content.length - 1)
        }
      }

      arg = {
        type: NodeTypes.SIMPLE_EXPRESSION,
        content,
        isStatic,
        loc,
      }
    }

    return {
      type: NodeTypes.DIRECTIVE,
      name: dirName,
      exp: value && {
        type: NodeTypes.SIMPLE_EXPRESSION,
        content: value.content,
        isStatic: false,
        loc: value.loc,
      },
      loc,
      arg,
    }
  }
}
これで今回扱いたい AST Node にパースすることができました.
Transformer の実装
続いて,この AST を Codegen 用の AST に transform する実装を書いていきます.
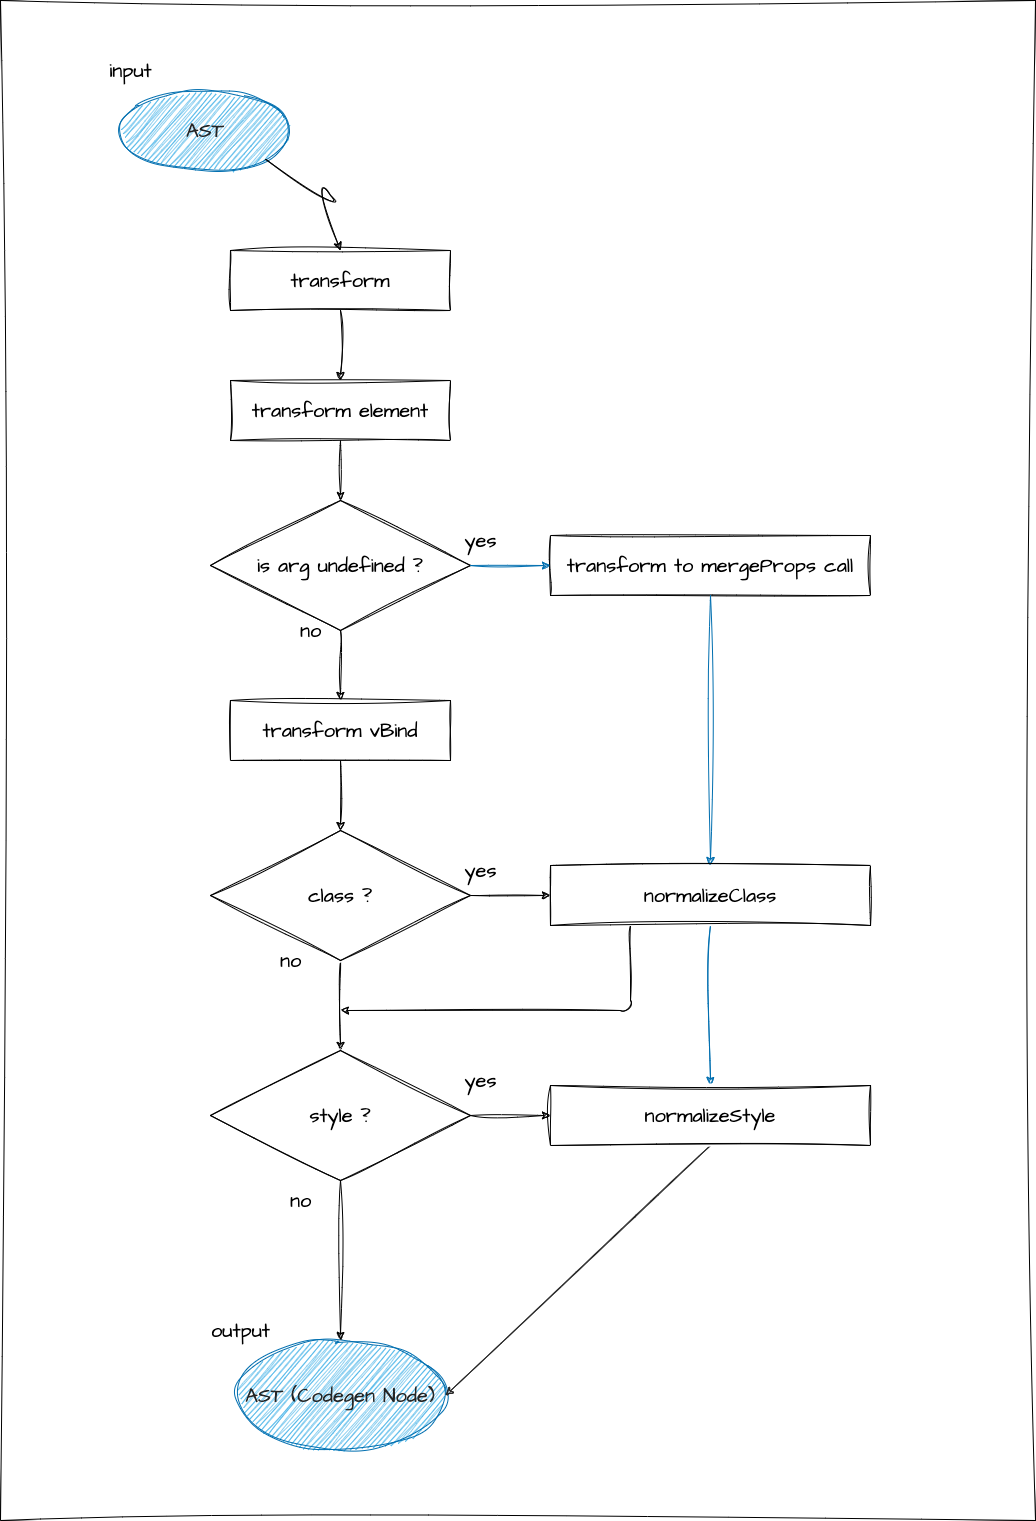
少々複雑なので,以下の図に軽く流れをまとめました.まずはそちらをご覧ください.
大まかに,必要な項目を挙げると,v-bind に引数が存在するかどうか,class かどうか,style かどうかです.
※ 今回関係してくる処理以外の部分は省略しています.(あまり厳格な図ではありませんがご了承ください.)

まず,前提として,ディレクティブというものは基本的に要素 (element) に対して宣言されているものなので,
ディレクティブに関する transformer は transformElement に呼ばれます.
今回は v-bind を実装したいので,transformVBind と言う関数を実装していくのですが,
注意点として,この関数では args が存在している宣言のみの変換を行う点が挙げられます.
transformVBind は,
v-bind:id="count"のようなものを,
{
  id: count
}
というオブジェクト(実際にはこのオブジェクトを表す Codegen Node)に変換する役割のみを持ちます.
本家の実装でも,以下のような説明がなされています.
codegen for the entire props object. This transform here is only for v-bind with args.
流れを見てもわかる通り,transformElement では directive の arg をチェックして,存在していなければ transformVBind を実行せず mergeProps という関数呼び出しに変換しています.
v-bind="hoge"の形式で渡された引数と,そのほかの props をマージする関数です.
<p v-bind="bindingObject" class="my-class">hello</p>↓
h('p', mergeProps(bindingObject, { class: 'my-class' }), 'hello')また,class と style に関してはさまざまな開発者インタフェースを持っているため,normalize する必要があります.
https://vuejs.org/api/built-in-directives.html#v-bind
normalizeClass と normalizeStyle という関数を実装し,それぞれに適用します.
arg が動的な場合は,特定が不可能なため,normalizeProps という関数を実装し,それを呼び出すようにします. (内部で normalizeClass と normalizeStyle を呼び出します)
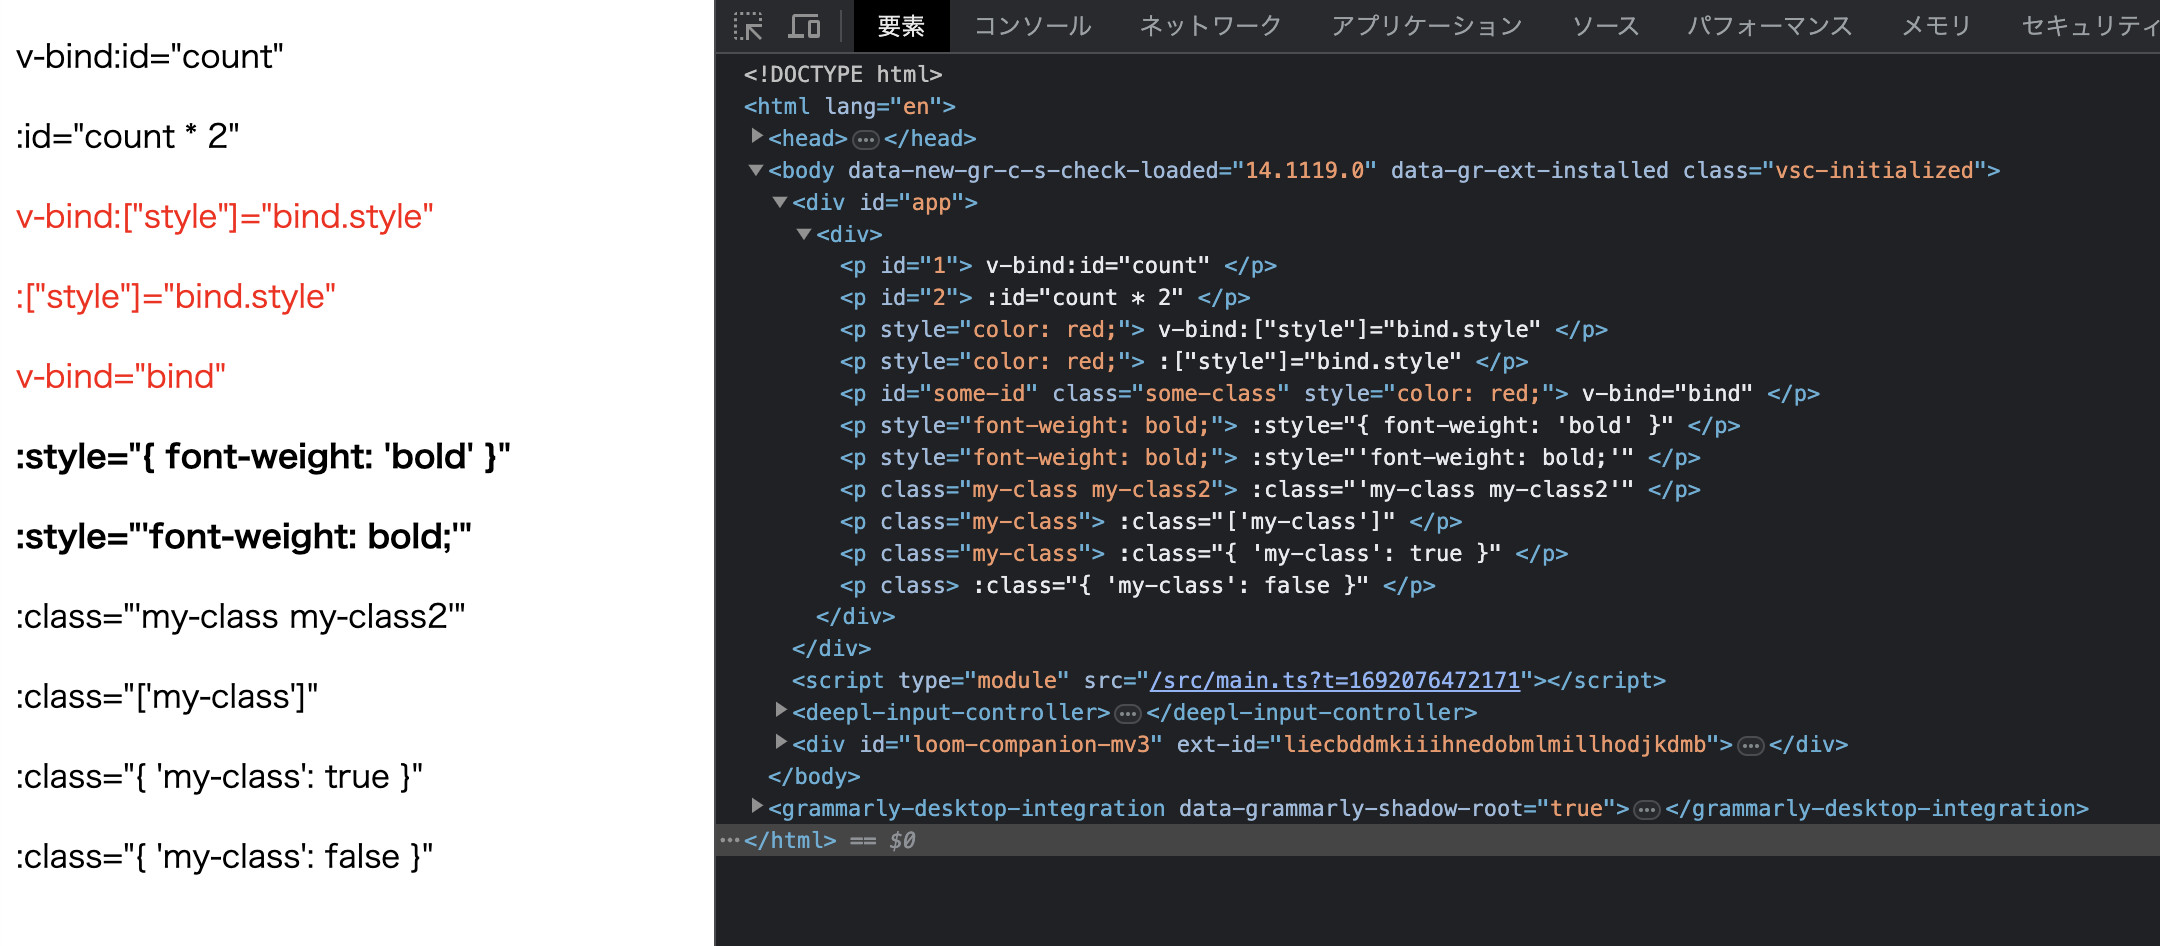
さてここまで実装できたら動作を見てみましょう!

とっても良さそうです!
Same-name Shorthand (Vue 3.4+)
Vue 3.4 から,属性名と変数名が同じ場合の省略記法がサポートされています.
<!-- 従来の記法 -->
<div :id="id" :class="class" :style="style"></div>

<!-- Same-name Shorthand -->
<div :id :class :style></div>
この機能を実装するには,パーサーとトランスフォーマーを修正する必要があります.
パーサーでの対応
:prop のように値が省略された場合,exp は undefined になります.
return {
  type: NodeTypes.DIRECTIVE,
  name: dirName,
  exp: value && {  // value がない場合は exp は undefined
    type: NodeTypes.SIMPLE_EXPRESSION,
    content: value.content,
    isStatic: false,
    loc: value.loc,
  },
  loc,
  arg,
};
トランスフォーマーでの対応
transformBind で exp が undefined の場合,arg の内容を exp として使用します.
export const transformBind: DirectiveTransform = (dir, _node, context) => {
  let { exp } = dir;
  const arg = dir.arg!;

  // Same-name shorthand: :prop は :prop="prop" と同じ
  if (!exp) {
    if (arg.type !== NodeTypes.SIMPLE_EXPRESSION || !arg.isStatic) {
      // 動的な引数には対応しない
      context.onError(
        createCompilerError(ErrorCodes.X_V_BIND_NO_EXPRESSION, dir.loc)
      );
      return { props: [] };
    }
    // arg の内容を exp として使用
    const propName = camelize(arg.content);
    exp = {
      type: NodeTypes.SIMPLE_EXPRESSION,
      content: propName,
      isStatic: false,
      loc: arg.loc,
    };
  }

  if (arg.type !== NodeTypes.SIMPLE_EXPRESSION) {
    arg.children.unshift(`(`);
    arg.children.push(`) || ""`);
  } else if (!arg.isStatic) {
    arg.content = `${arg.content} || ""`;
  }

  return { props: [createObjectProperty(arg, exp)] };
};これにより,:id と書くだけで :id="id" と同じ意味になります.
次回は v-on を実装していきます.
ここまでのソースコード: GitHub
