包架构
重构
您可能会想,"嗯?我们只实现了这么一点,您就想重构?"但这本书的目标之一是"能够阅读 Vue.js 源代码".
考虑到这一点,我希望始终关注 Vue.js 风格的文件和目录结构.所以,请允许我做一点重构...
Vue.js 设计
runtime-core 和 runtime-dom
让我稍微解释一下官方 Vue.js 的结构.在这次重构中,我们将创建两个目录:"runtime-core" 和 "runtime-dom".

「代码已经能运行了,为什么还要拆分?」你可能会这样想.
实际上 Vue.js 被设计成不仅可以在浏览器中运行,还可以在 SSR(服务端渲染)和原生应用(Vue Native)等环境中运行.
这就是为什么要将「纯逻辑」和「DOM 操作」分离的原因!
为了解释它们各自是什么,"runtime-core" 包含 Vue.js 运行时的核心功能.在这个阶段,可能很难理解什么是核心,什么不是.
所以,我认为通过查看与 "runtime-dom" 的关系会更容易理解.顾名思义,"runtime-dom" 是一个包含依赖于 DOM 的实现的目录.粗略地说,它可以理解为"依赖于浏览器的操作".它包括 DOM 操作,如 querySelector 和 createElement.
在 runtime-core 中,我们不编写这样的操作,而是设计它在纯 TypeScript 的世界中描述 Vue.js 运行时的核心逻辑.例如,它包括与虚拟 DOM 和组件相关的实现.嗯,我认为随着 chibivue 开发的进展,这会变得更清楚,所以如果您不理解,请暂时按照书中描述的进行重构.
每个文件的角色和依赖关系
我们现在将在 runtime-core 和 runtime-dom 中创建一些文件.必要的文件如下:
pwd # ~
mkdir packages/runtime-core
mkdir packages/runtime-dom

## core
touch packages/runtime-core/index.ts
touch packages/runtime-core/apiCreateApp.ts
touch packages/runtime-core/component.ts
touch packages/runtime-core/componentOptions.ts
touch packages/runtime-core/renderer.ts

## dom
touch packages/runtime-dom/index.ts
touch packages/runtime-dom/nodeOps.ts
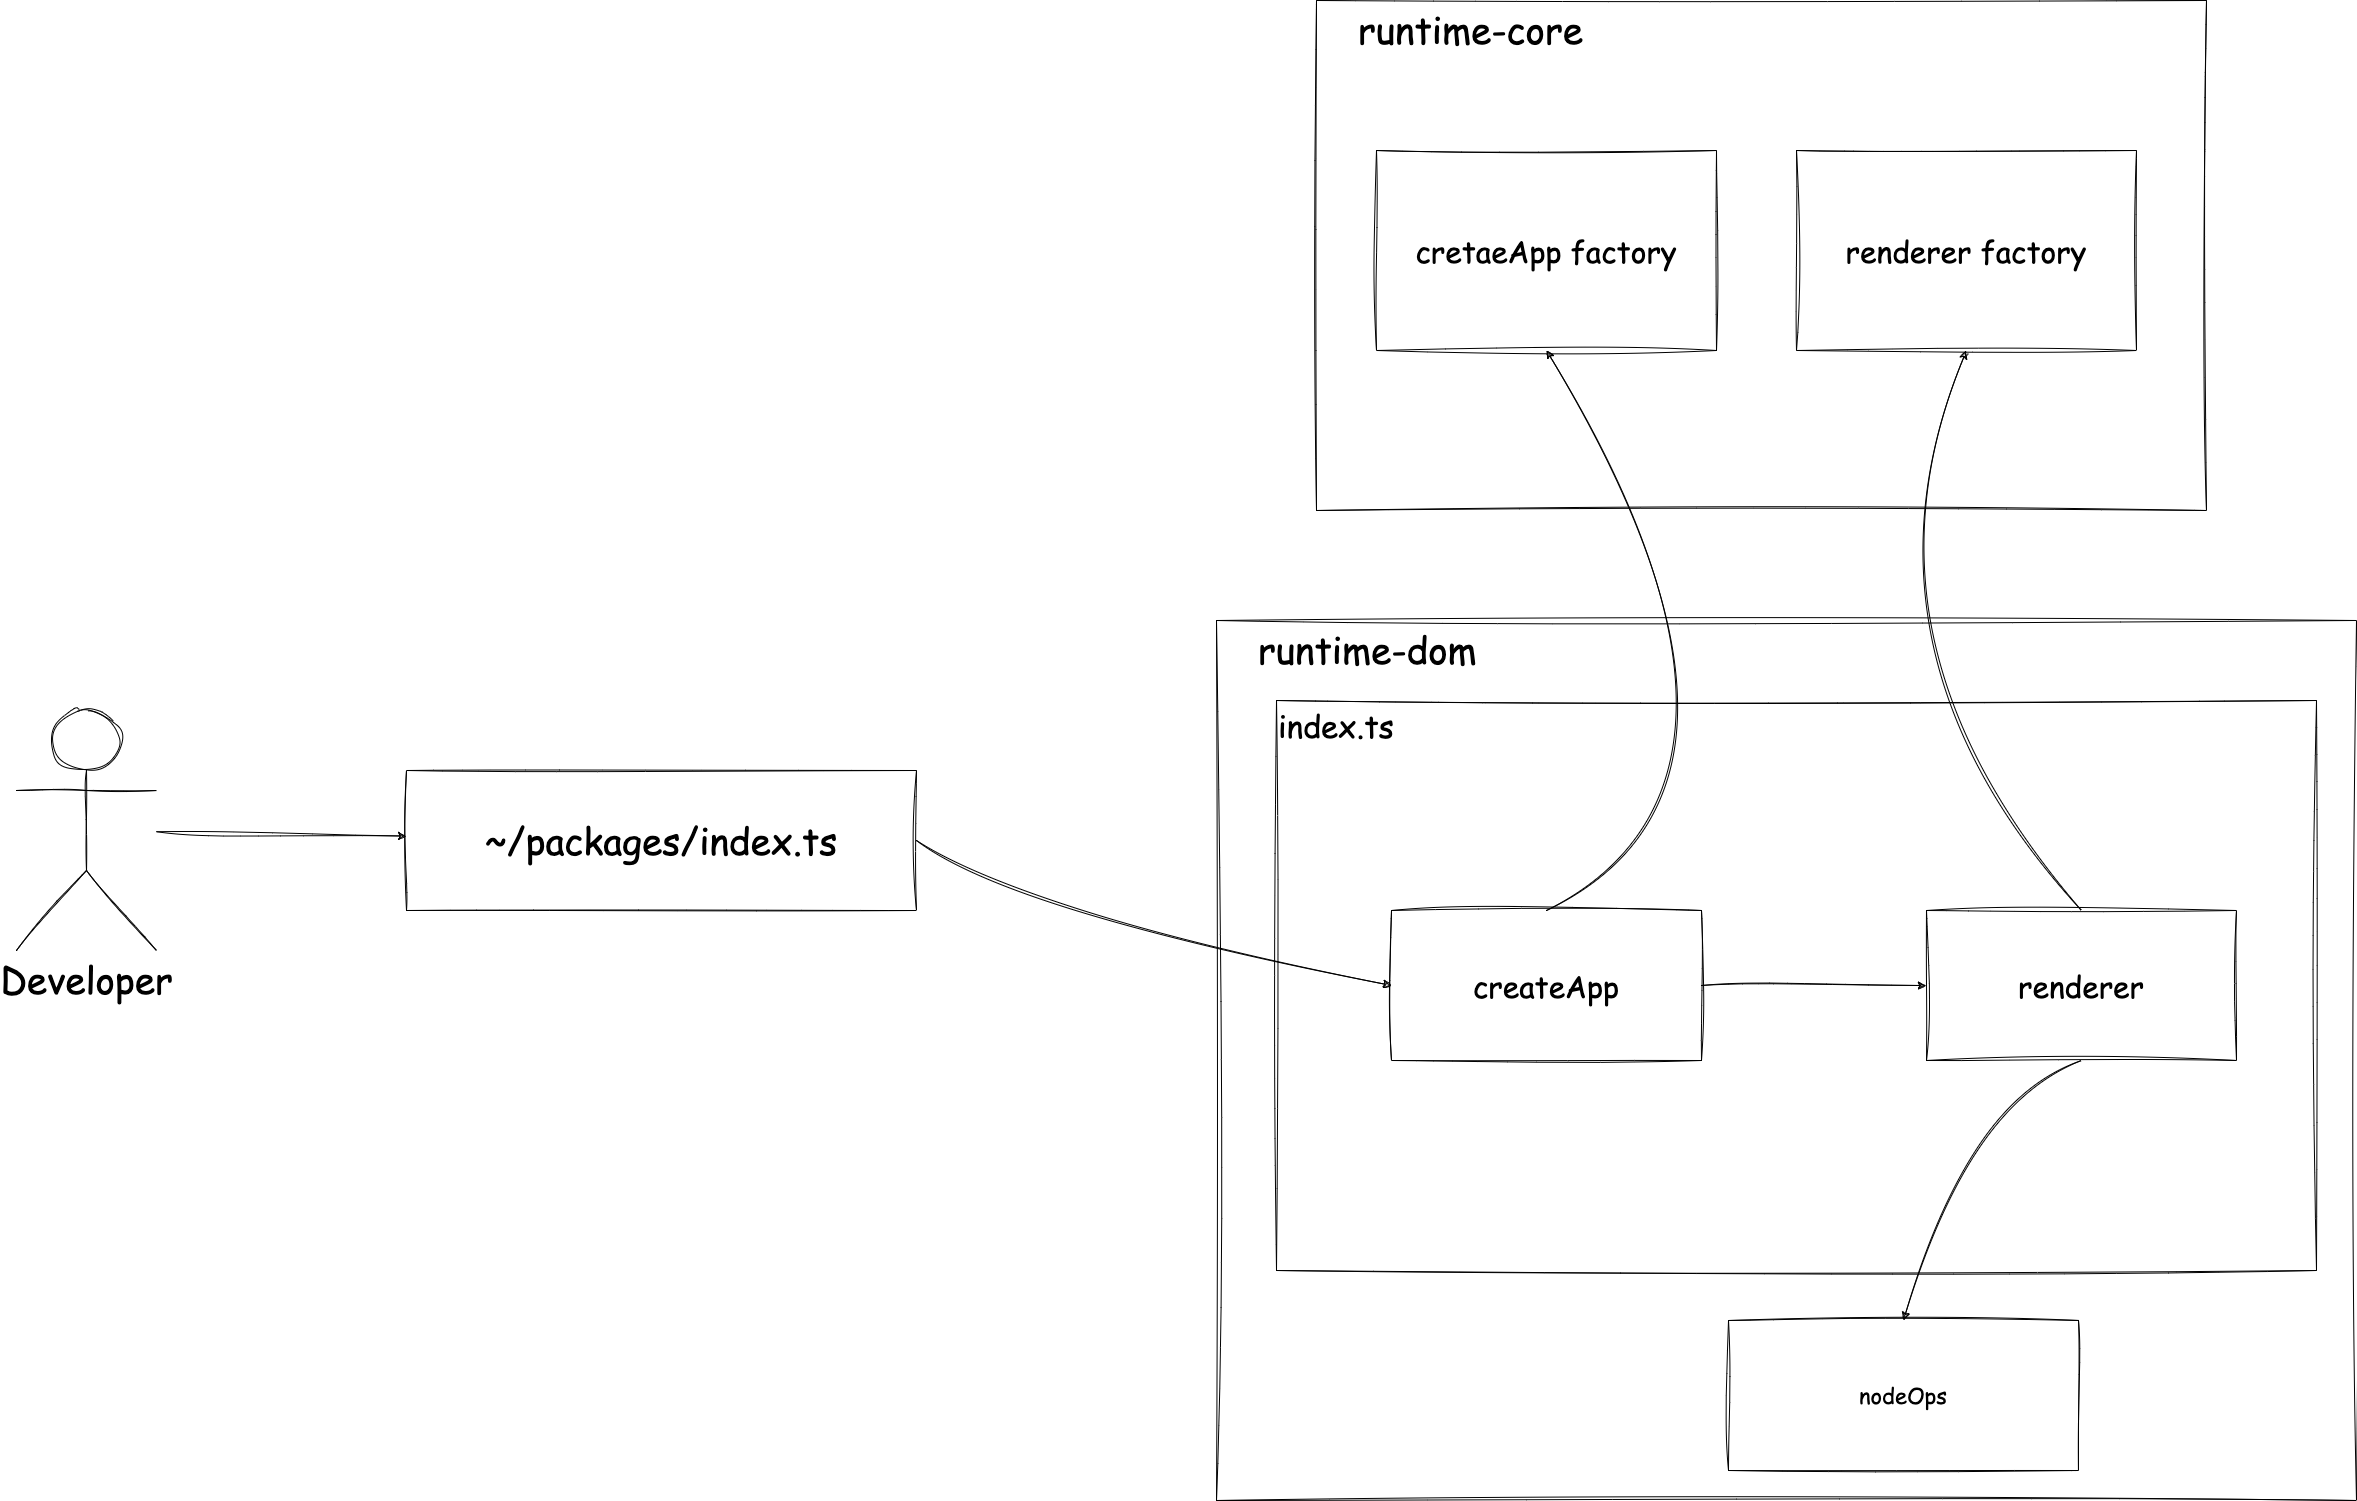
至于这些文件的角色,仅仅用文字解释可能很难理解,所以请参考以下图表:

渲染器的设计
如前所述,Vue.js 将依赖于 DOM 的部分与 Vue.js 的纯核心功能分离.首先,我希望您注意 "runtime-core" 中的渲染器工厂和 "runtime-dom" 中的 nodeOps.在我们之前实现的示例中,我们直接在 createApp 返回的应用程序的 mount 方法中进行渲染.
// 这是之前的代码
export const createApp = (options: Options): App => {
  return {
    mount: selector => {
      const root = document.querySelector(selector)
      if (root) {
        root.innerHTML = options.render() // 渲染
      }
    },
  }
}
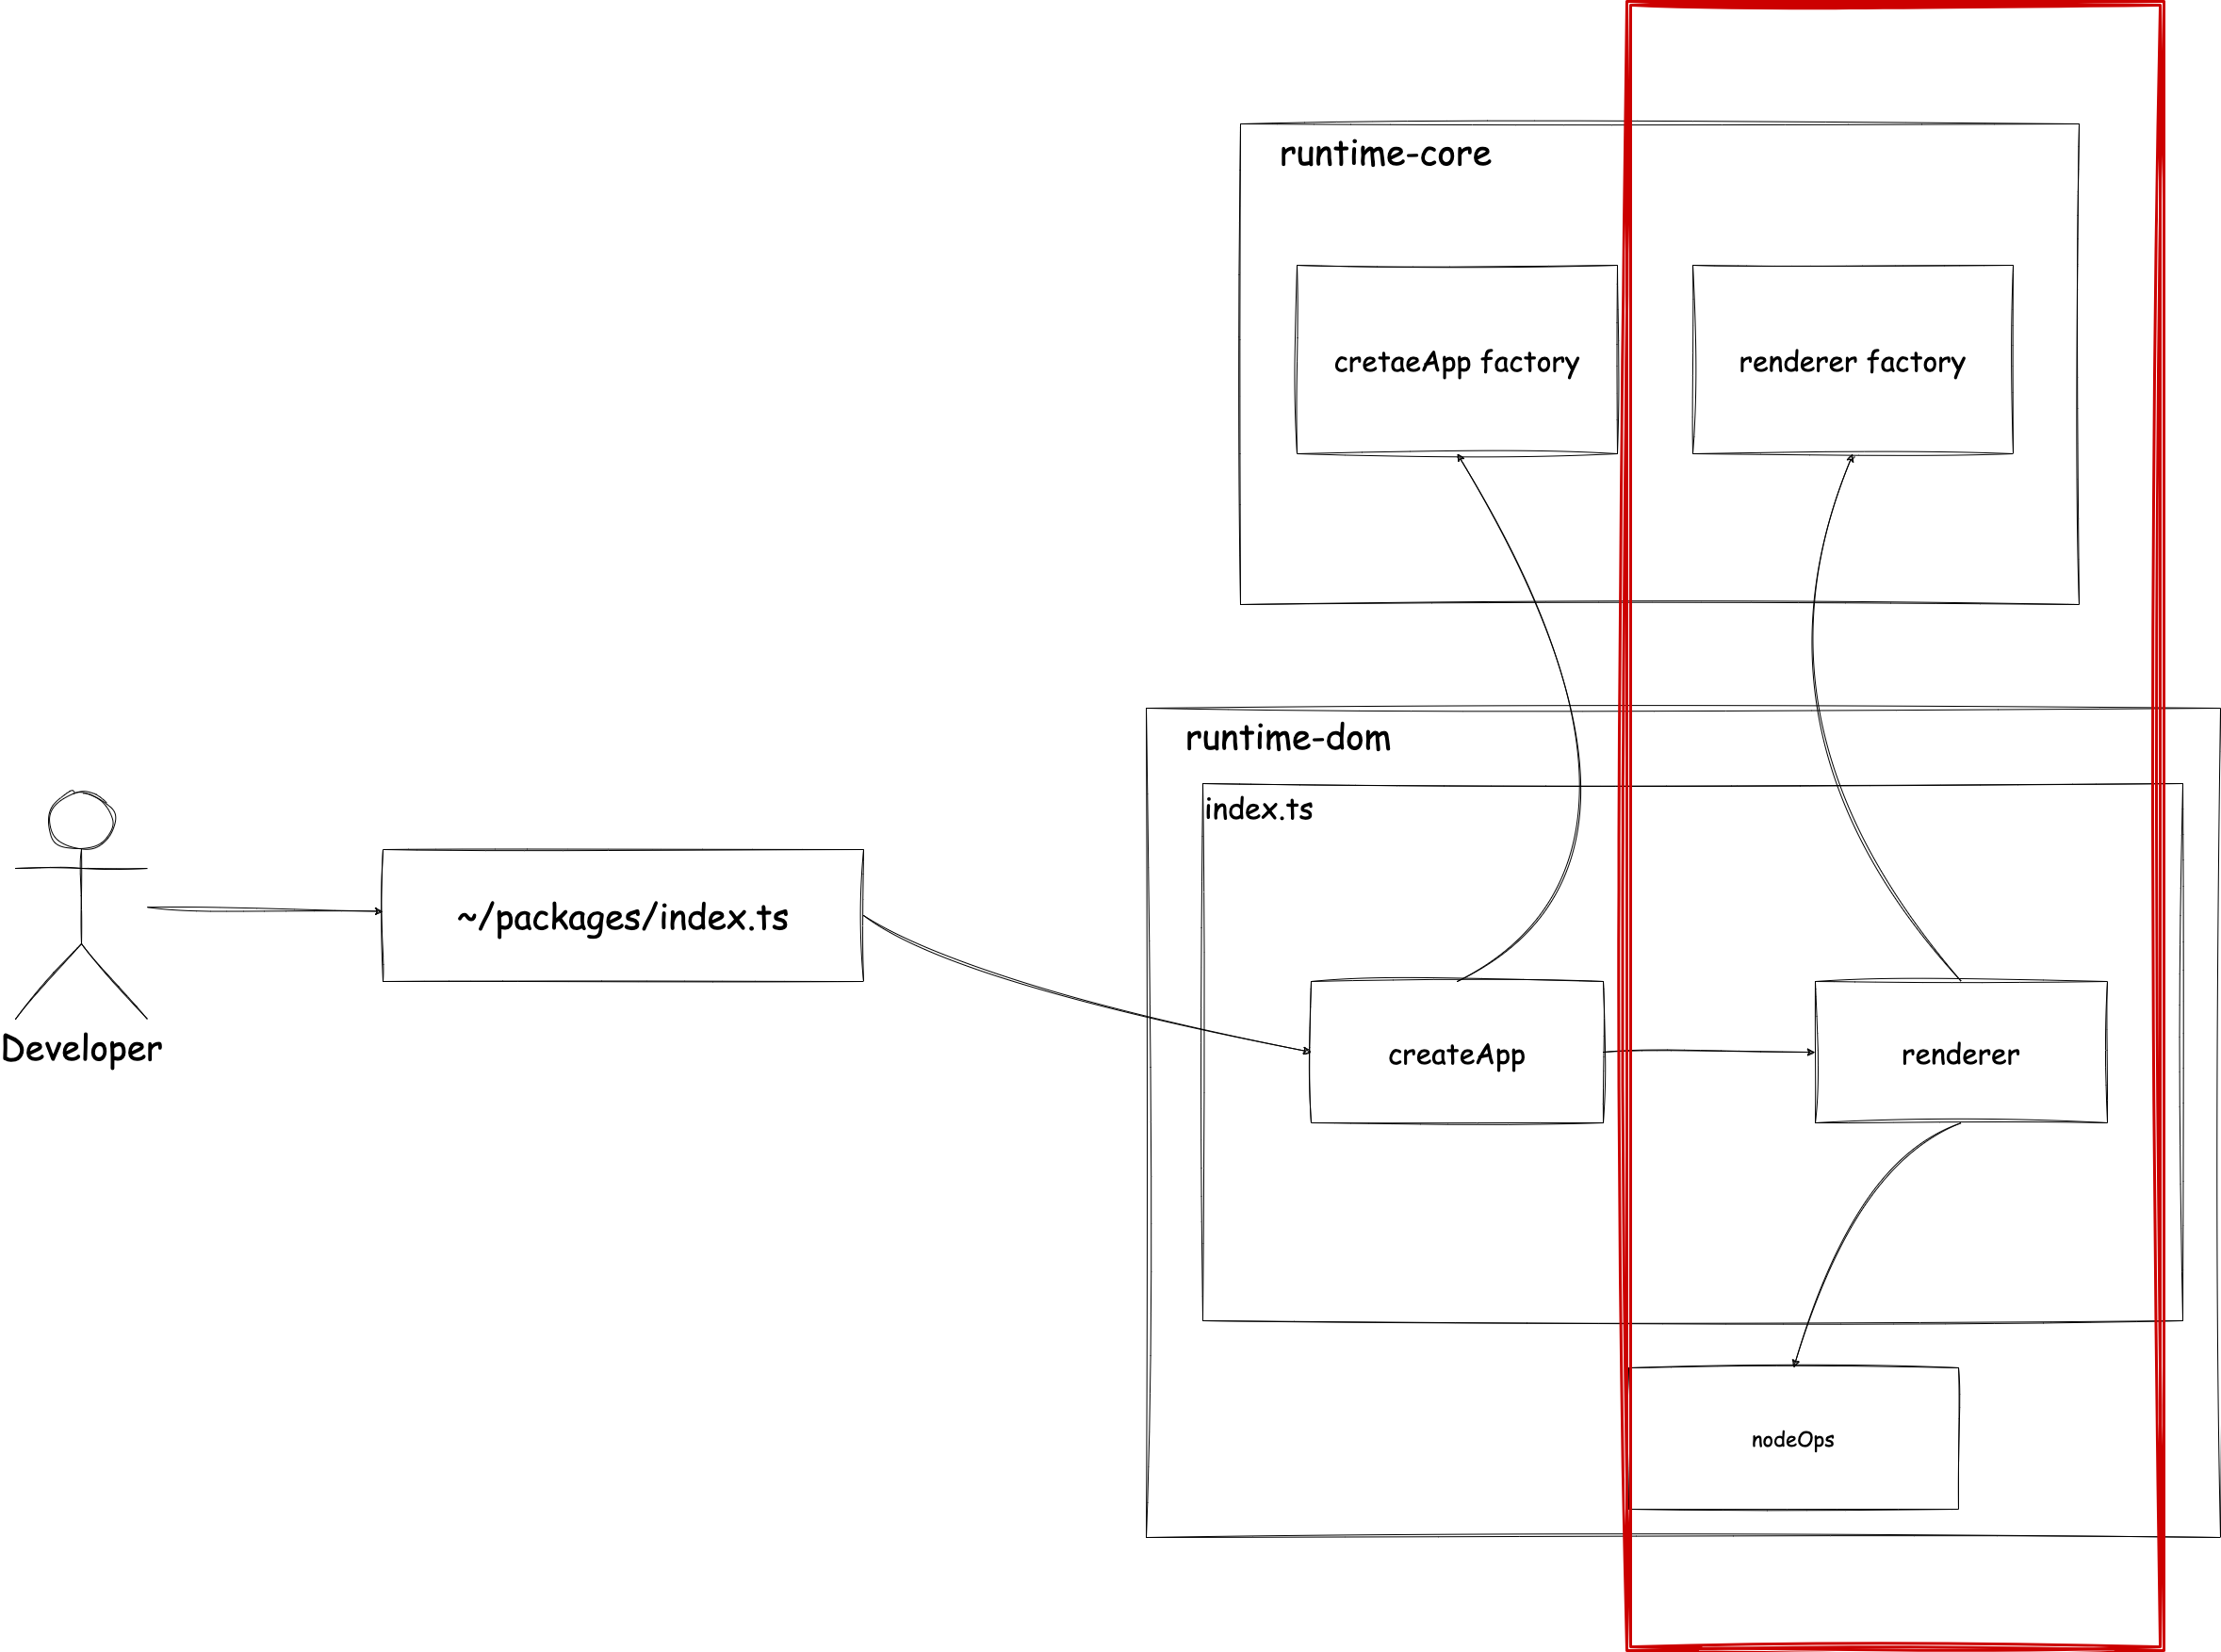
此时,代码很短,一点也不复杂,所以乍一看似乎很好.然而,当我们将来为虚拟 DOM 编写补丁渲染逻辑时,它会变得更加复杂.在 Vue.js 中,这个负责渲染的部分被分离为"渲染器".那就是 "runtime-core/renderer.ts".说到渲染,很容易想象它依赖于在 SPA 中控制浏览器 DOM 的 API(document)(创建元素,设置文本等).因此,为了将这个依赖于 DOM 的部分与 Vue.js 的核心渲染逻辑分离,已经做了一些技巧.它是这样工作的:
- 在
runtime-dom/nodeOps中实现一个用于 DOM 操作的对象. - 在
runtime-core/renderer中实现一个工厂函数,该函数生成一个只包含渲染逻辑的对象.在这样做时,确保将处理节点(不限于 DOM)的对象作为参数传递给工厂函数. - 在
runtime-dom/index.ts中使用nodeOps和renderer的工厂来完成渲染器.
这是图表中用红色突出显示的部分. 
让我解释一下源代码.此时,虚拟 DOM 的渲染功能尚未实现,所以我们将创建与之前相同功能的代码.
首先,在 runtime-core/renderer 中实现用于节点(不限于 DOM)操作的对象接口.
export interface RendererOptions<HostNode = RendererNode> {
  setElementText(node: HostNode, text: string): void
}

export interface RendererNode {
  [key: string]: any
}

export interface RendererElement extends RendererNode {}
目前,只有 setElementText 函数,但您可以想象将来会实现 createElement 和 removeChild 等函数.
关于 RendererNode 和 RendererElement,请暂时忽略它们.(这里的实现只是为成为节点的对象定义一个通用类型,而不依赖于 DOM.)
在此文件中实现渲染器工厂函数,该函数将 RendererOptions 作为参数.
export type RootRenderFunction<HostElement = RendererElement> = (
  message: string,
  container: HostElement,
) => void

export function createRenderer(options: RendererOptions) {
  const { setElementText: hostSetElementText } = options

  const render: RootRenderFunction = (message, container) => {
    hostSetElementText(container, message) // 在这种情况下,我们只是简单地插入消息,所以实现是这样的
  }

  return { render }
}
接下来,在 runtime-dom/nodeOps 中实现 nodeOps.
import { RendererOptions } from '../runtime-core'

export const nodeOps: RendererOptions<Node> = {
  setElementText(node, text) {
    node.textContent = text
  },
}
这里没有什么特别困难的.
现在,让我们在 runtime-dom/index.ts 中完成渲染器.
import { createRenderer } from '../runtime-core'
import { nodeOps } from './nodeOps'

const { render } = createRenderer(nodeOps)
这样,渲染器的重构就完成了.
DI 和 DIP
让我们看看渲染器的设计.总结一下:
- 在
runtime-core/renderer中实现一个工厂函数来生成渲染器. - 在
runtime-dom/nodeOps中实现一个用于依赖于 DOM 的操作(操纵)的对象. - 在
runtime-dom/index中结合工厂函数和nodeOps来生成渲染器.
这些是"DIP"和"DI"的概念.

DI 和 DIP 是设计模式中比较难理解的概念.
一开始只需要有个大概的印象就可以了!
随着你写更多的代码,你会恍然大悟:「啊,原来是这样!」
首先,让我们谈谈 DIP(依赖倒置原则).通过实现接口,我们可以倒置依赖关系.您应该注意的是在 renderer.ts 中实现的 RendererOptions 接口.工厂函数和 nodeOps 都应该遵守这个 RendererOptions 接口(依赖于 RendererOptions 接口).

如果把 DIP 比作做菜的话...
只要有「食谱(interface)」,无论食材是国产还是进口,都能做出同样的菜.
渲染器(厨师)只需要按照「RendererOptions(食谱)」来做,不需要关心实际的食材(DOM 操作或其他操作).
通过使用这个,我们执行 DI.依赖注入(DI)是一种通过从外部注入对象所依赖的对象来减少依赖的技术.在这种情况下,渲染器依赖于实现 RendererOptions 的对象(在这种情况下是 nodeOps).我们不是直接从渲染器实现这种依赖,而是将其作为工厂的参数接收.通过使用这些技术,我们确保渲染器不依赖于 DOM.

DIP: 依赖接口(契约),而不是具体实现
DI: 从外部接收依赖(注入它们)
结合这两者,可以让代码更灵活,更易于测试!
如果您不熟悉 DI 和 DIP,它们可能是困难的概念,但它们是经常使用的重要技术,所以我希望您能够自己研究和理解它们.
完成 createApp
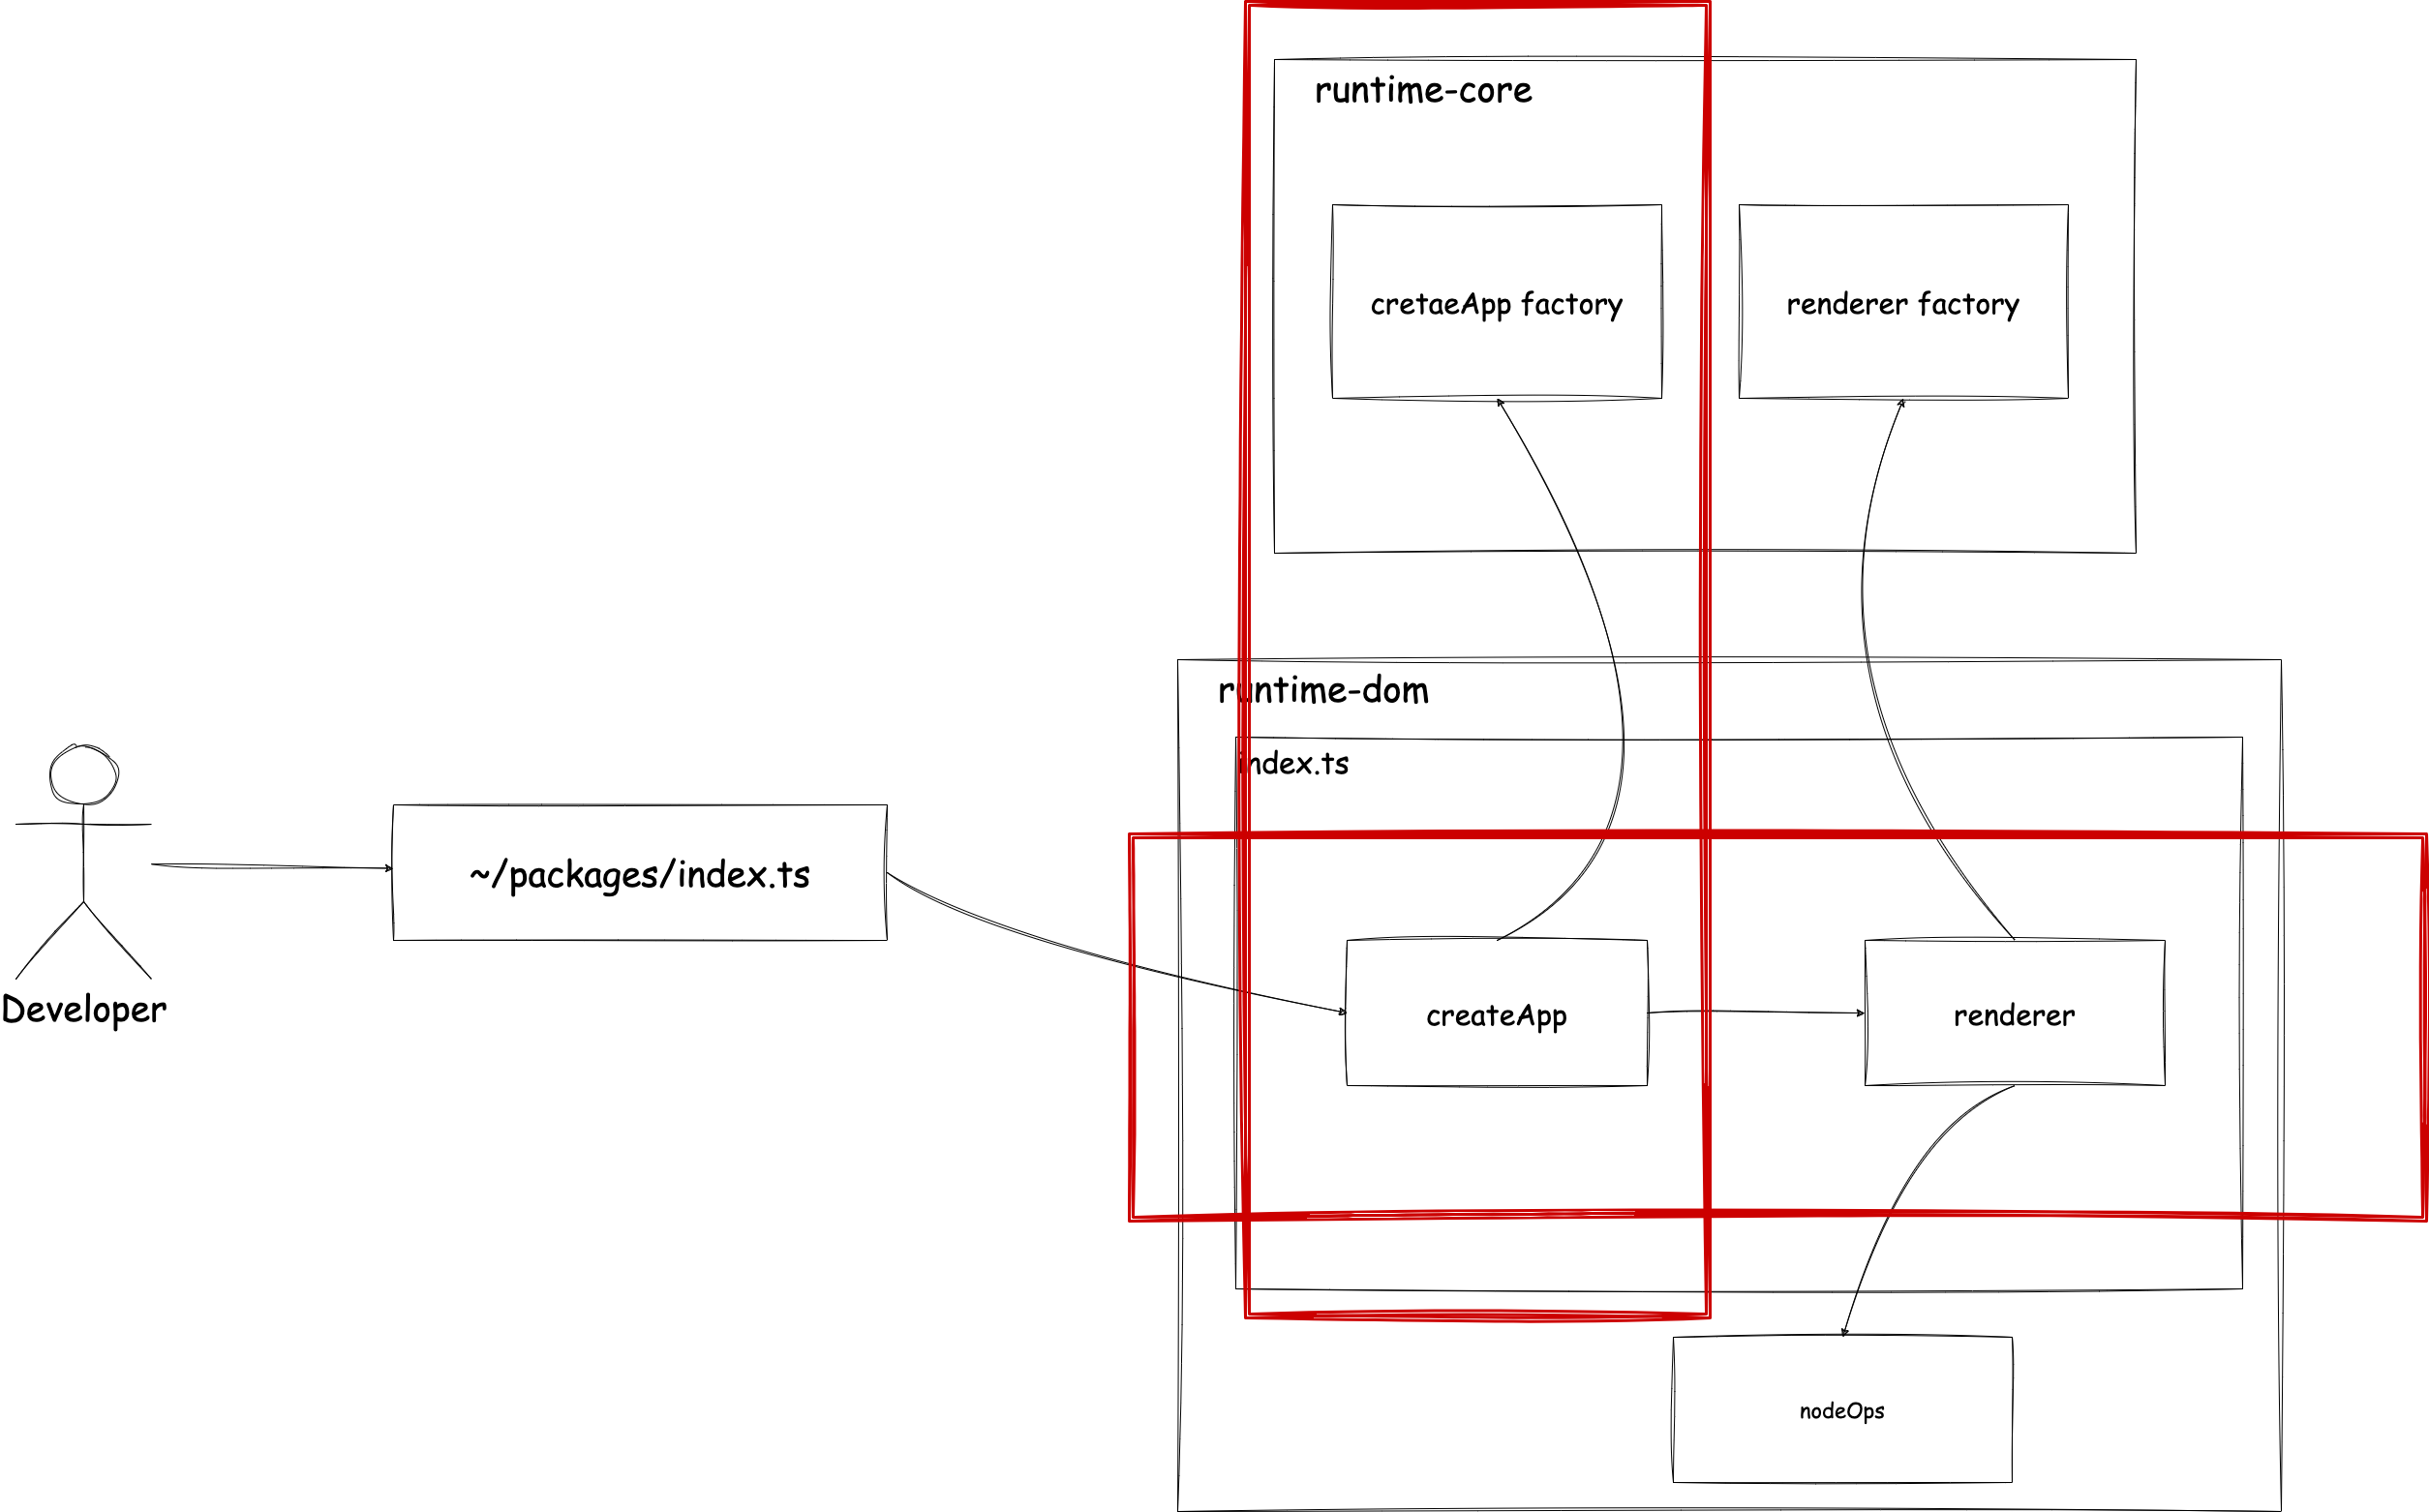
现在,让我们回到实现.现在渲染器已经生成,我们需要做的就是考虑以下图表中的红色区域.

然而,这是一个简单的任务.我们只需要实现 createApp 的工厂函数,以便它可以接受我们之前创建的渲染器.
// ~/packages/runtime-core apiCreateApp.ts

import { Component } from './component'
import { RootRenderFunction } from './renderer'

export interface App<HostElement = any> {
  mount(rootContainer: HostElement | string): void
}

export type CreateAppFunction<HostElement> = (
  rootComponent: Component,
) => App<HostElement>

export function createAppAPI<HostElement>(
  render: RootRenderFunction<HostElement>,
): CreateAppFunction<HostElement> {
  return function createApp(rootComponent) {
    const app: App = {
      mount(rootContainer: HostElement) {
        const message = rootComponent.render!()
        render(message, rootContainer)
      },
    }

    return app
  }
}// ~/packages/runtime-dom/index.ts
import {
CreateAppFunction,
createAppAPI,
createRenderer,
} from '../runtime-core'
import { nodeOps } from './nodeOps'
const { render } = createRenderer(nodeOps)
const _createApp = createAppAPI(render)
export const createApp = ((...args) => {
const app = _createApp(...args)
const { mount } = app
app.mount = (selector: string) => {
const container = document.querySelector(selector)
if (!container) return
mount(container)
}
return app
}) as CreateAppFunction<Element>我将类型移动到了 ~/packages/runtime-core/component.ts,但这并不重要,所以请参考源代码(这只是与原始 Vue.js 对齐).
现在我们更接近原始 Vue.js 的源代码,让我们测试一下.如果消息仍然显示,那就没问题.
到此为止的源代码: chibivue (GitHub)
