组件的代理和 setupContext
组件的代理
组件有一个重要概念叫做代理(Proxy).
简单来说,它是一个允许访问组件实例数据(公共属性)的代理. 代理结合了 setup 的结果(状态,函数),data,props 和其他访问.
让我们考虑以下代码(包括在 chibivue 中未实现的部分,所以请将其视为常规 Vue):
<script>
export default defineComponent({
  props: { parentCount: { type: Number, default: 0 } },
  data() {
    return { dataState: { count: 0 } }
  },
  methods: {
    incrementData() {
      this.dataState.count++
    },
  },
  setup() {
    const state = reactive({ count: 0 })
    const increment = () => {
      state.count++
    }

    return { state, increment }
  },
})
</script>

<template>
  <div>
    <p>count (parent): {{ parentCount }}</p>

    <br />

    <p>count (data): {{ dataState.count }}</p>
    <button @click="incrementData">increment (data)</button>

    <br />

    <p>count: {{ state.count }}</p>
    <button @click="increment">increment</button>
  </div>
</template>
这段代码工作正常,但它是如何绑定到模板的?
让我们考虑另一个例子.
<script setup>
const ChildRef = ref()

// 访问组件的方法和数据
// ChildRef.value?.incrementData
// ChildRef.value?.increment
</script>

<template>
  <!-- Child 是前面提到的组件 -->
  <Child :ref="ChildRef" />
</template>
在这种情况下,你可以通过 ref 访问组件的信息.
为了实现这一点,ComponentInternalInstance 有一个名为 proxy 的属性,它保存用于数据访问的代理.
换句话说,模板(渲染函数)和 ref 引用 instance.proxy.
interface ComponentInternalInstance {
  proxy: ComponentPublicInstance | null
}
这个代理的实现是使用 Proxy 完成的,大致如下:
instance.proxy = instance.proxy = new Proxy(
  instance,
  PublicInstanceProxyHandlers,
)

export const PublicInstanceProxyHandlers: ProxyHandler<any> = {
  get(instance: ComponentRenderContext, key: string) {
    const { setupState, ctx, props } = instance

    // 根据键按 setupState -> props -> ctx 的顺序检查,如果存在则返回值
  },
}
让我们实现这个代理!
一旦实现,让我们修改代码以将此代理传递给渲染函数和 ref.
到此为止的源代码:
chibivue (GitHub)
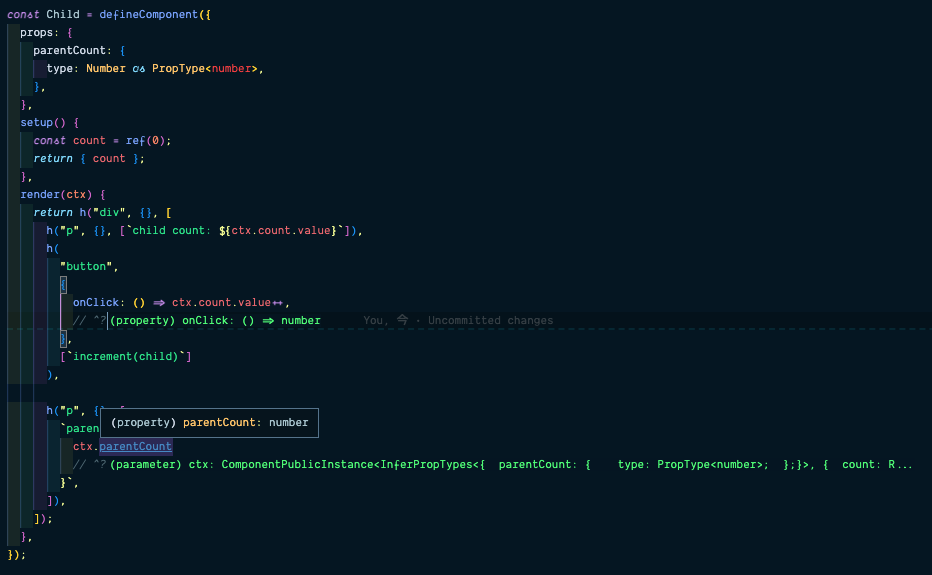
※ 顺便说一下,我还实现了 defineComponent 和相关类型检查的实现(这允许我们推断代理数据的类型).
setupContext
https://ja.vuejs.org/api/composition-api-setup.html#setup-context
Vue 有一个名为 setupContext 的概念.这是在 setup 函数中暴露的上下文,包括 emit 和 expose.
目前,emit 正在工作,但实现有些粗糙.
const setupResult = component.setup(instance.props, {
  emit: instance.emit,
})
让我们正确定义 SetupContext 接口,并将其表示为实例持有的对象.
export interface ComponentInternalInstance {
  // .
  // .
  // .
  setupContext: SetupContext | null // 添加
}

export type SetupContext = {
  emit: (e: string, ...args: any[]) => void
}
然后,在创建实例时,生成 setupContext 并在执行 setup 函数时将此对象作为第二个参数传递.
expose
一旦你到达这一点,让我们尝试实现除 emit 之外的 SetupContext.
作为这次的例子,让我们实现 expose.
expose 是一个允许你明确定义公共属性的函数.
让我们目标实现如下的开发者接口:
const Child = defineComponent({
  setup(_, { expose }) {
    const count = ref(0)
    const count2 = ref(0)
    expose({ count })
    return { count, count2 }
  },
  template: `<p>hello</p>`,
})

const Child2 = defineComponent({
  setup() {
    const count = ref(0)
    const count2 = ref(0)
    return { count, count2 }
  },
  template: `<p>hello</p>`,
})

const app = createApp({
  setup() {
    const child = ref()
    const child2 = ref()

    const log = () => {
      console.log(
        child.value.count,
        child.value.count2, // 无法访问
        child2.value.count,
        child2.value.count2,
      )
    }

    return () =>
      h('div', {}, [
        h(Child, { ref: child }, []),
        h(Child2, { ref: child2 }, []),
        h('button', { onClick: log }, ['log']),
      ])
  },
})
对于不使用 expose 的组件,默认情况下一切仍然是公共的.
作为方向,让我们在实例内部有一个名为 exposed 的对象,如果这里设置了值,我们将把这个对象传递给 templateRef 的 ref.
export interface ComponentInternalInstance {
  // .
  // .
  // .
  exposed: Record<string, any> | null // 添加
}
让我们实现 expose 函数,以便可以在这里注册对象.
ProxyRefs
在本章中,我们实现了 proxy 和 exposedProxy,但实际上与原始 Vue 有一些差异. 那就是"ref 被解包".(在 proxy 的情况下,setupState 具有此属性而不是 proxy.)
这些是用 ProxyRefs 实现的,处理器在名为 shallowUnwrapHandlers 的名称下实现. 这允许我们在编写模板或处理代理时消除 ref 特定值的冗余.
const shallowUnwrapHandlers: ProxyHandler<any> = {
  get: (target, key, receiver) => unref(Reflect.get(target, key, receiver)),
  set: (target, key, value, receiver) => {
    const oldValue = target[key]
    if (isRef(oldValue) && !isRef(value)) {
      oldValue.value = value
      return true
    } else {
      return Reflect.set(target, key, value, receiver)
    }
  },
}<template>
<!-- <p>{{ count.value }}</p> 不需要这样写 -->
<p>{{ count }}</p>
</template>如果你实现到这一点,以下代码应该工作.
import { createApp, defineComponent, h, ref } from 'chibivue'

const Child = defineComponent({
  setup(_, { expose }) {
    const count = ref(0)
    const count2 = ref(0)
    expose({ count })
    return { count, count2 }
  },
  template: `<p>child {{ count }} {{ count2 }}</p>`,
})

const Child2 = defineComponent({
  setup() {
    const count = ref(0)
    const count2 = ref(0)
    return { count, count2 }
  },
  template: `<p>child2 {{ count }} {{ count2 }}</p>`,
})

const app = createApp({
  setup() {
    const child = ref()
    const child2 = ref()

    const increment = () => {
      child.value.count++
      child.value.count2++ // 无法访问
      child2.value.count++
      child2.value.count2++
    }

    return () =>
      h('div', {}, [
        h(Child, { ref: child }, []),
        h(Child2, { ref: child2 }, []),
        h('button', { onClick: increment }, ['increment']),
      ])
  },
})

app.mount('#app')
模板绑定和 with 语句
实际上,本章的更改存在一个问题. 让我们尝试运行以下代码:
const Child2 = {
  setup() {
    const state = reactive({ count: 0 })
    return { state }
  },
  template: `<p>child2 count: {{ state.count }}</p>`,
}
这只是一个简单的代码,但它不工作. 它抱怨 state 未定义.
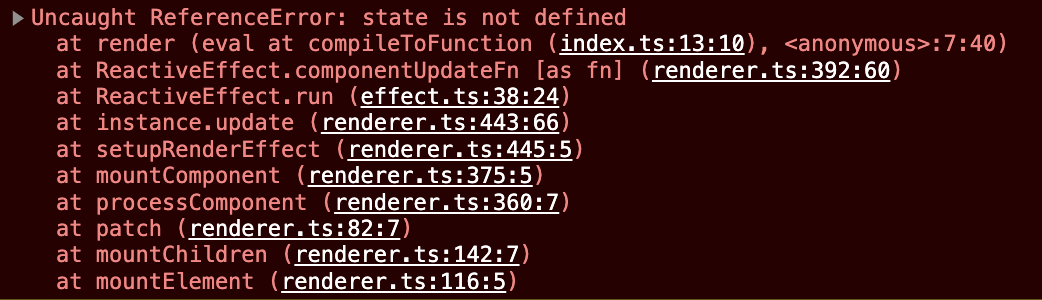
原因是当将代理作为参数传递给 with 语句时,必须定义 has.
所以让我们在 PublicInstanceProxyHandlers 中实现 has. 如果键存在于 setupState,props 或 ctx 中,它应该返回 true.
export const PublicInstanceProxyHandlers: ProxyHandler<any> = {
  // .
  // .
  // .
  has(
    { _: { setupState, ctx, propsOptions } }: ComponentRenderContext,
    key: string,
  ) {
    let normalizedProps
    return (
      hasOwn(setupState, key) ||
      ((normalizedProps = propsOptions[0]) && hasOwn(normalizedProps, key)) ||
      hasOwn(ctx, key)
    )
  },
}
如果它工作正常,应该可以正常工作!
到此为止的源代码: chibivue (GitHub)