套件架構
重構
您可能會想,「嗯?我們只實現了這麼一點,您就想重構?」但這本書的目標之一是「能夠閱讀 Vue.js 源代碼」.
考慮到這一點,我希望始終關注 Vue.js 風格的文件和目錄結構.所以,請允許我做一點重構...
Vue.js 設計
runtime-core 和 runtime-dom
讓我稍微解釋一下官方 Vue.js 的結構.在這次重構中,我們將創建兩個目錄:「runtime-core」 和 「runtime-dom」.
為了解釋它們各自是什麼,「runtime-core」 包含 Vue.js 運行時的核心功能.在這個階段,可能很難理解什麼是核心,什麼不是.
所以,我認為通過查看與 「runtime-dom」 的關係會更容易理解.顧名思義,「runtime-dom」 是一個包含依賴於 DOM 的實現的目錄.粗略地說,它可以理解為「依賴於瀏覽器的操作」.它包括 DOM 操作,如 querySelector 和 createElement.
在 runtime-core 中,我們不編寫這樣的操作,而是設計它在純 TypeScript 的世界中描述 Vue.js 運行時的核心邏輯.例如,它包括與虛擬 DOM 和組件相關的實現.嗯,我認為隨著 chibivue 開發的進展,這會變得更清楚,所以如果您不理解,請暫時按照書中描述的進行重構.
每個文件的角色和依賴關係
我們現在將在 runtime-core 和 runtime-dom 中創建一些文件.必要的文件如下:
pwd # ~
mkdir packages/runtime-core
mkdir packages/runtime-dom

## core
touch packages/runtime-core/index.ts
touch packages/runtime-core/apiCreateApp.ts
touch packages/runtime-core/component.ts
touch packages/runtime-core/componentOptions.ts
touch packages/runtime-core/renderer.ts

## dom
touch packages/runtime-dom/index.ts
touch packages/runtime-dom/nodeOps.ts
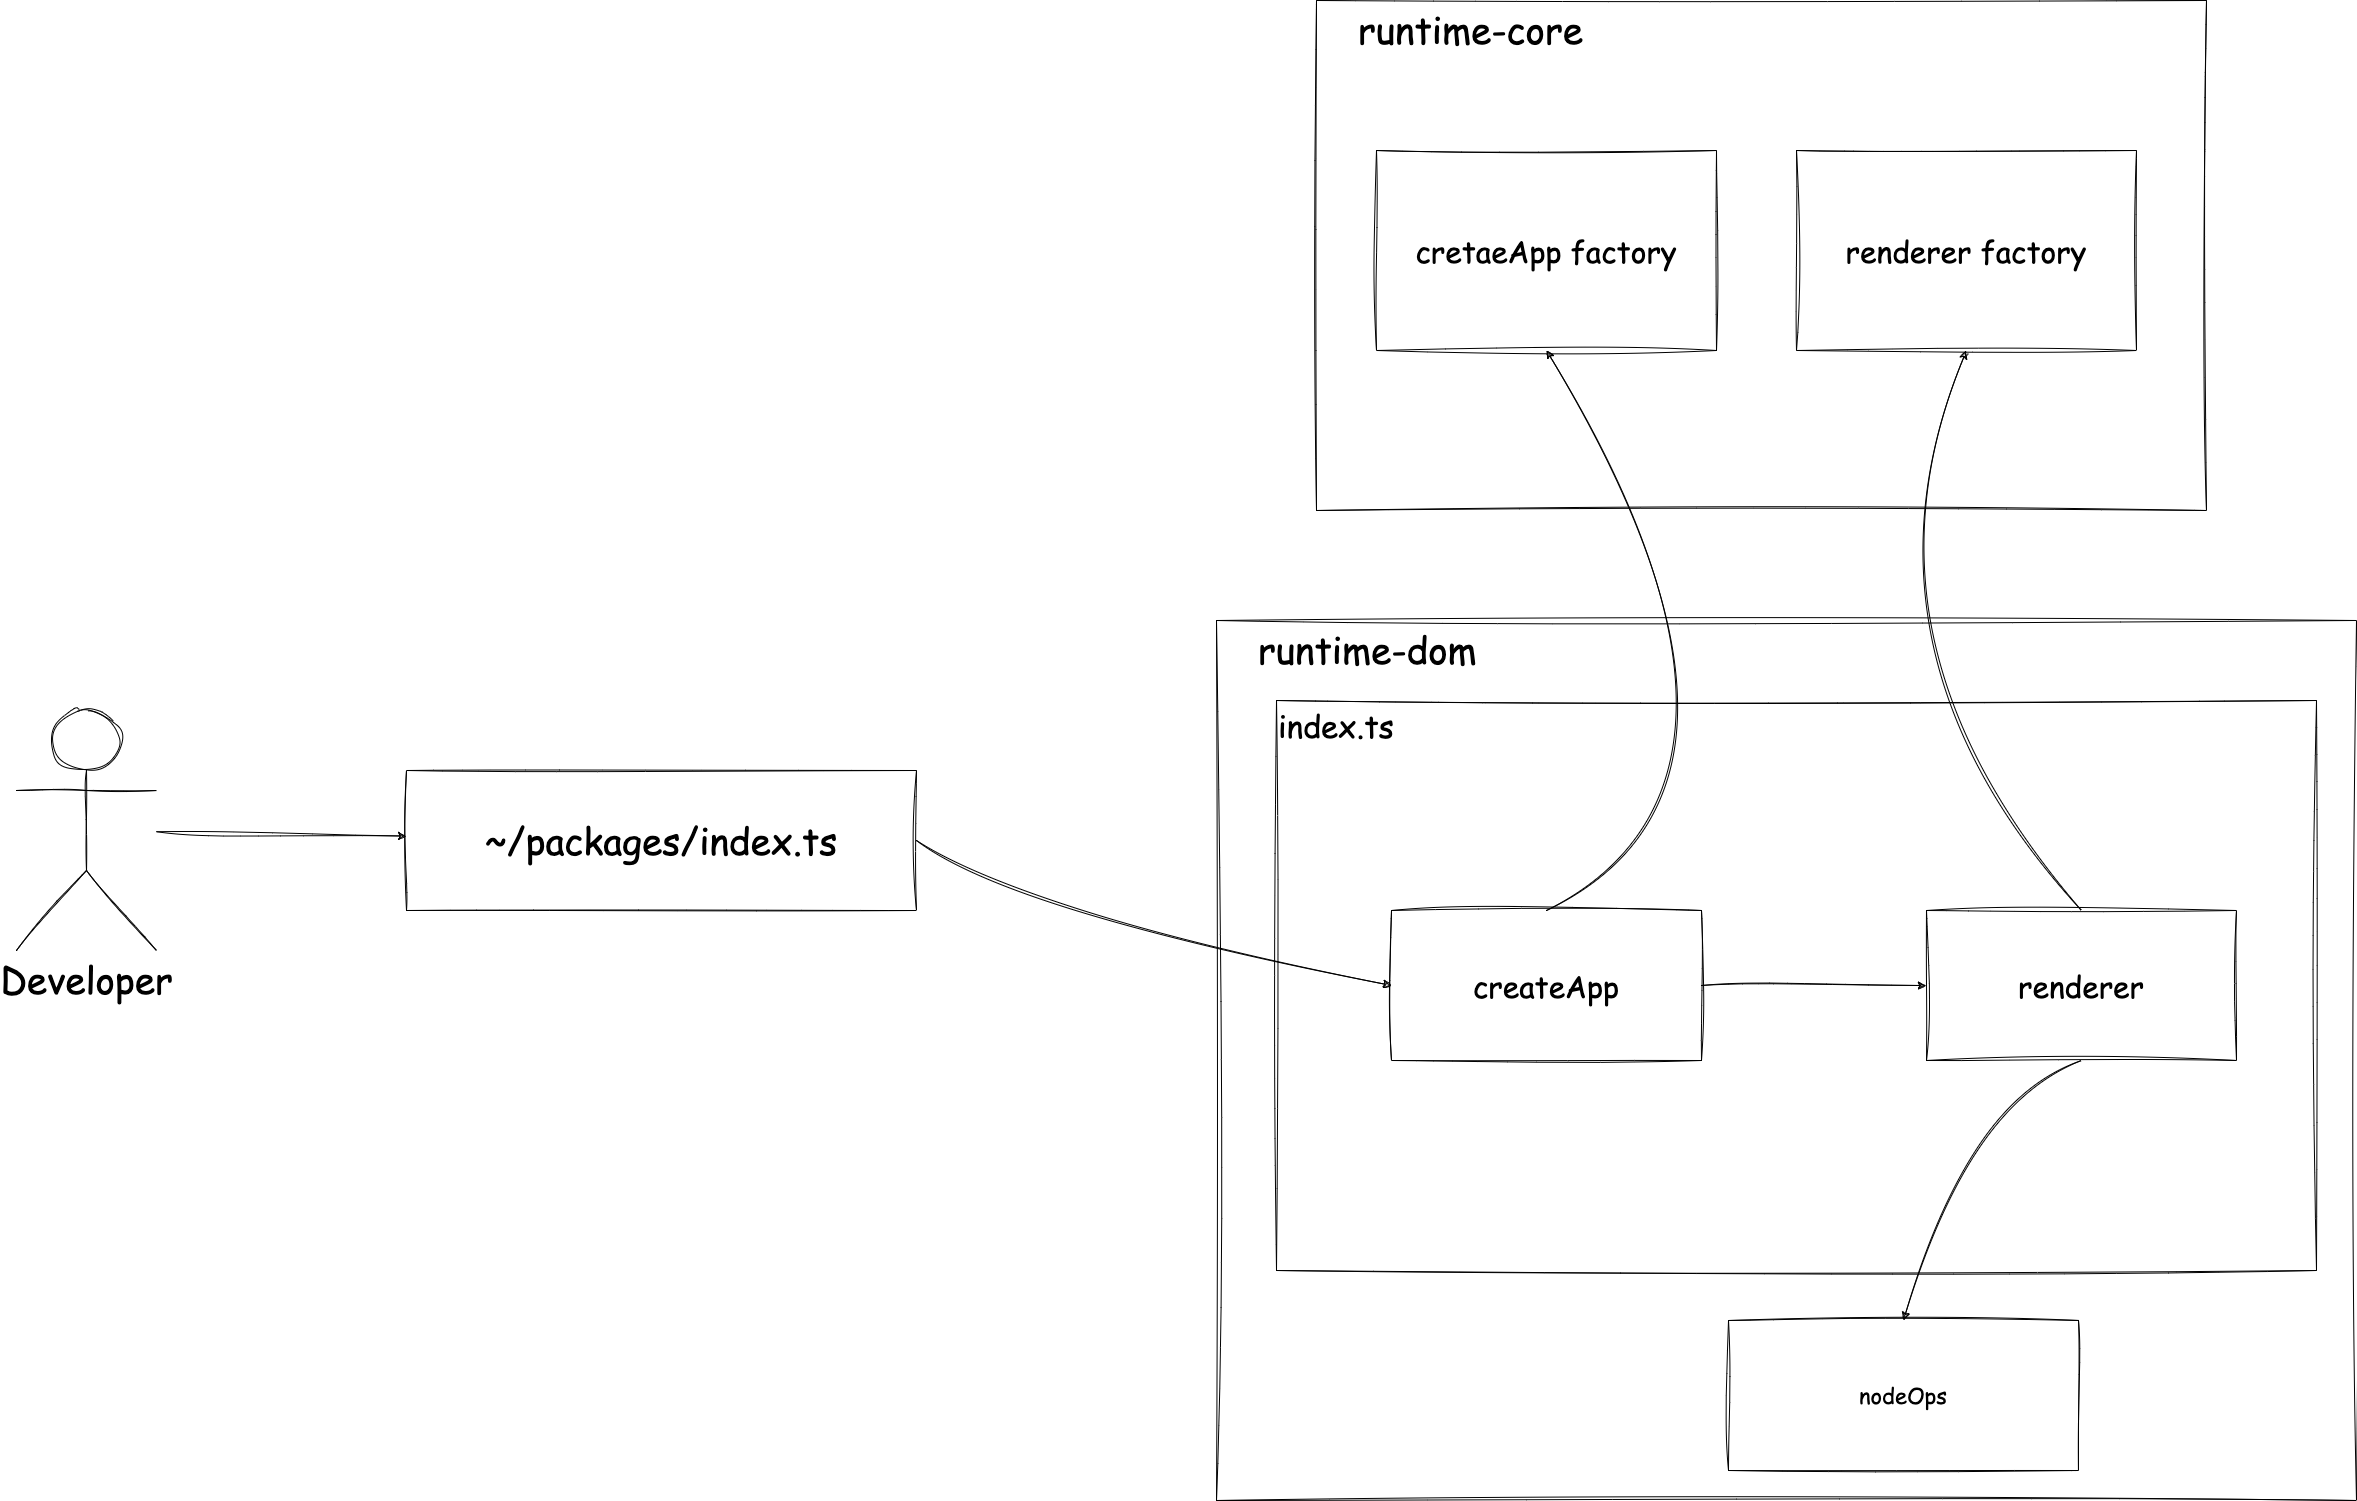
至於這些文件的角色,僅僅用文字解釋可能很難理解,所以請參考以下圖表:

渲染器的設計
如前所述,Vue.js 將依賴於 DOM 的部分與 Vue.js 的純核心功能分離.首先,我希望您注意 「runtime-core」 中的渲染器工廠和 「runtime-dom」 中的 nodeOps.在我們之前實現的示例中,我們直接在 createApp 返回的應用程式的 mount 方法中進行渲染.
// 這是之前的代碼
export const createApp = (options: Options): App => {
  return {
    mount: selector => {
      const root = document.querySelector(selector)
      if (root) {
        root.innerHTML = options.render() // 渲染
      }
    },
  }
}
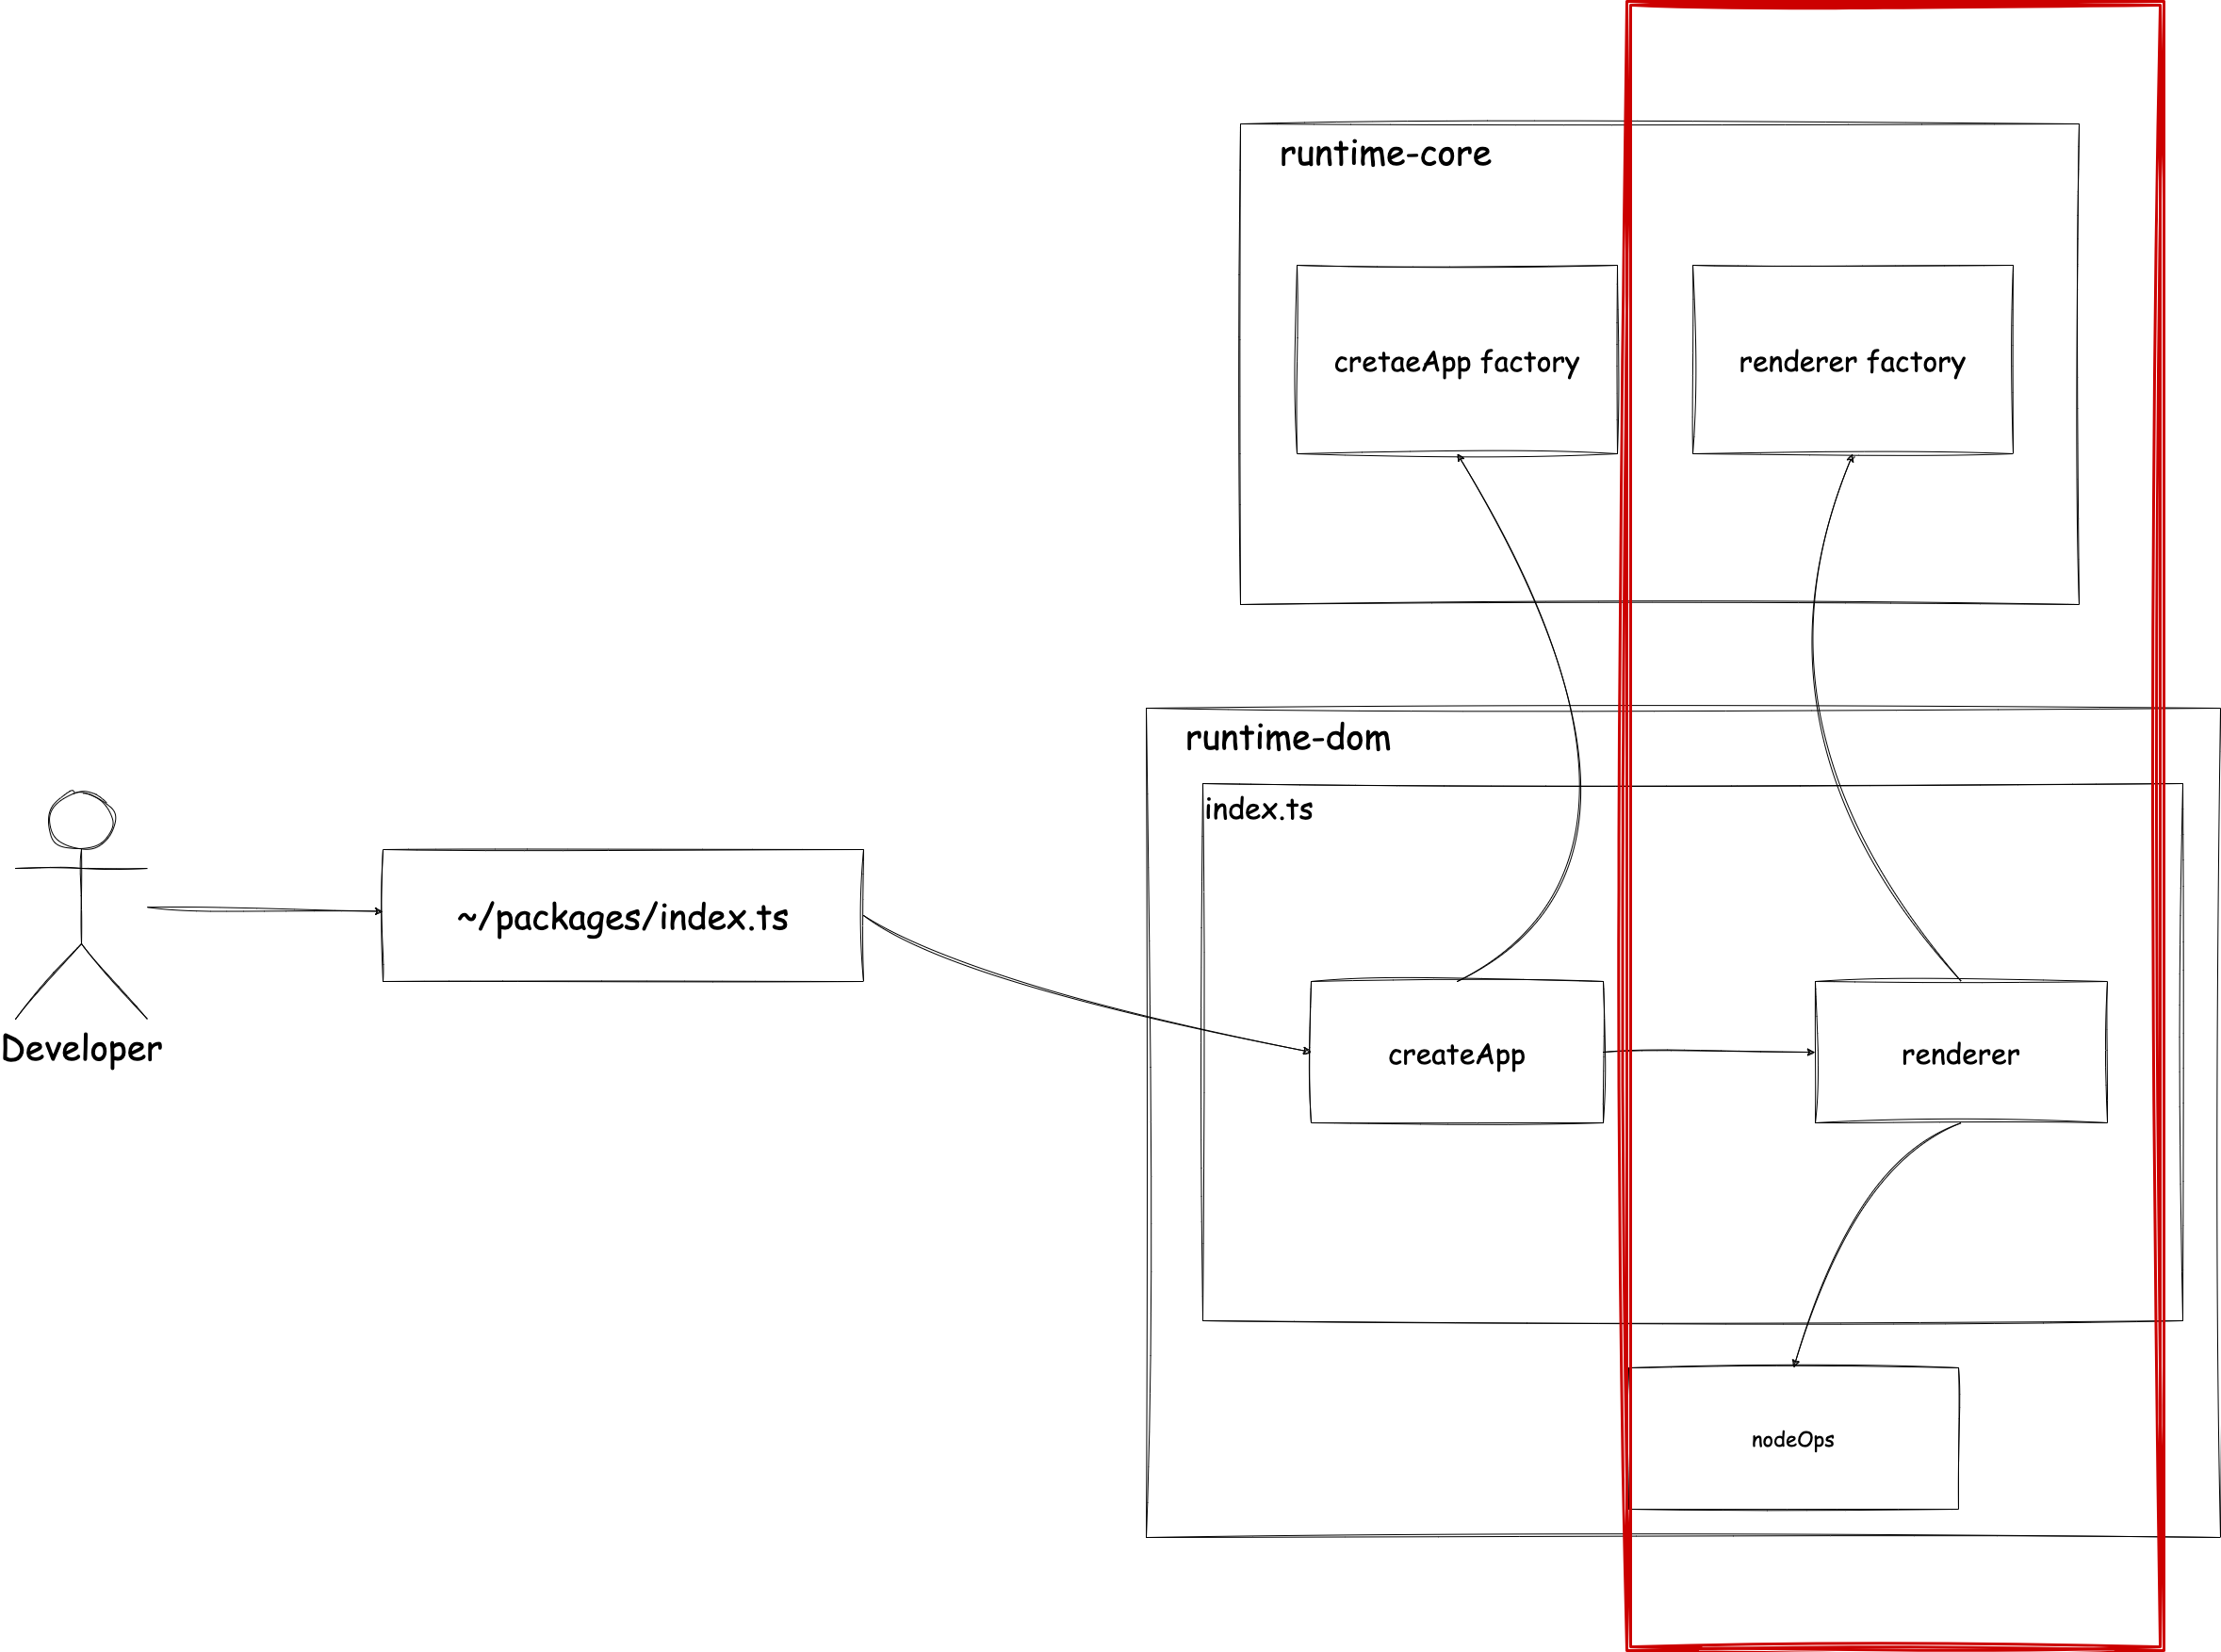
此時,代碼很短,一點也不複雜,所以乍一看似乎很好.然而,當我們將來為虛擬 DOM 編寫補丁渲染邏輯時,它會變得更加複雜.在 Vue.js 中,這個負責渲染的部分被分離為「渲染器」.那就是 「runtime-core/renderer.ts」.說到渲染,很容易想像它依賴於在 SPA 中控制瀏覽器 DOM 的 API(document)(創建元素,設置文本等).因此,為了將這個依賴於 DOM 的部分與 Vue.js 的核心渲染邏輯分離,已經做了一些技巧.它是這樣工作的:
- 在
runtime-dom/nodeOps中實現一個用於 DOM 操作的對象. - 在
runtime-core/renderer中實現一個工廠函數,該函數生成一個只包含渲染邏輯的對象.在這樣做時,確保將處理節點(不限於 DOM)的對象作為參數傳遞給工廠函數. - 在
runtime-dom/index.ts中使用nodeOps和renderer的工廠來完成渲染器.
這是圖表中用紅色突出顯示的部分. 
讓我解釋一下源代碼.此時,虛擬 DOM 的渲染功能尚未實現,所以我們將創建與之前相同功能的代碼.
首先,在 runtime-core/renderer 中實現用於節點(不限於 DOM)操作的對象介面.
export interface RendererOptions<HostNode = RendererNode> {
  setElementText(node: HostNode, text: string): void
}

export interface RendererNode {
  [key: string]: any
}

export interface RendererElement extends RendererNode {}
目前,只有 setElementText 函數,但您可以想像將來會實現 createElement 和 removeChild 等函數.
關於 RendererNode 和 RendererElement,請暫時忽略它們.(這裡的實現只是為成為節點的對象定義一個通用類型,而不依賴於 DOM.)
在此文件中實現渲染器工廠函數,該函數將 RendererOptions 作為參數.
export type RootRenderFunction<HostElement = RendererElement> = (
  message: string,
  container: HostElement,
) => void

export function createRenderer(options: RendererOptions) {
  const { setElementText: hostSetElementText } = options

  const render: RootRenderFunction = (message, container) => {
    hostSetElementText(container, message) // 在這種情況下,我們只是簡單地插入消息,所以實現是這樣的
  }

  return { render }
}
接下來,在 runtime-dom/nodeOps 中實現 nodeOps.
import { RendererOptions } from '../runtime-core'

export const nodeOps: RendererOptions<Node> = {
  setElementText(node, text) {
    node.textContent = text
  },
}
這裡沒有什麼特別困難的.
現在,讓我們在 runtime-dom/index.ts 中完成渲染器.
import { createRenderer } from '../runtime-core'
import { nodeOps } from './nodeOps'

const { render } = createRenderer(nodeOps)
這樣,渲染器的重構就完成了.
DI 和 DIP
讓我們看看渲染器的設計.總結一下:
- 在
runtime-core/renderer中實現一個工廠函數來生成渲染器. - 在
runtime-dom/nodeOps中實現一個用於依賴於 DOM 的操作(操縱)的對象. - 在
runtime-dom/index中結合工廠函數和nodeOps來生成渲染器.
這些是「DIP」和「DI」的概念.首先,讓我們談談 DIP(依賴倒置原則).通過實現介面,我們可以倒置依賴關係.您應該注意的是在 renderer.ts 中實現的 RendererOptions 介面.工廠函數和 nodeOps 都應該遵守這個 RendererOptions 介面(依賴於 RendererOptions 介面).通過使用這個,我們執行 DI.依賴注入(DI)是一種通過從外部注入對象所依賴的對象來減少依賴的技術.在這種情況下,渲染器依賴於實現 RendererOptions 的對象(在這種情況下是 nodeOps).我們不是直接從渲染器實現這種依賴,而是將其作為工廠的參數接收.通過使用這些技術,我們確保渲染器不依賴於 DOM.
如果您不熟悉 DI 和 DIP,它們可能是困難的概念,但它們是經常使用的重要技術,所以我希望您能夠自己研究和理解它們.
完成 createApp
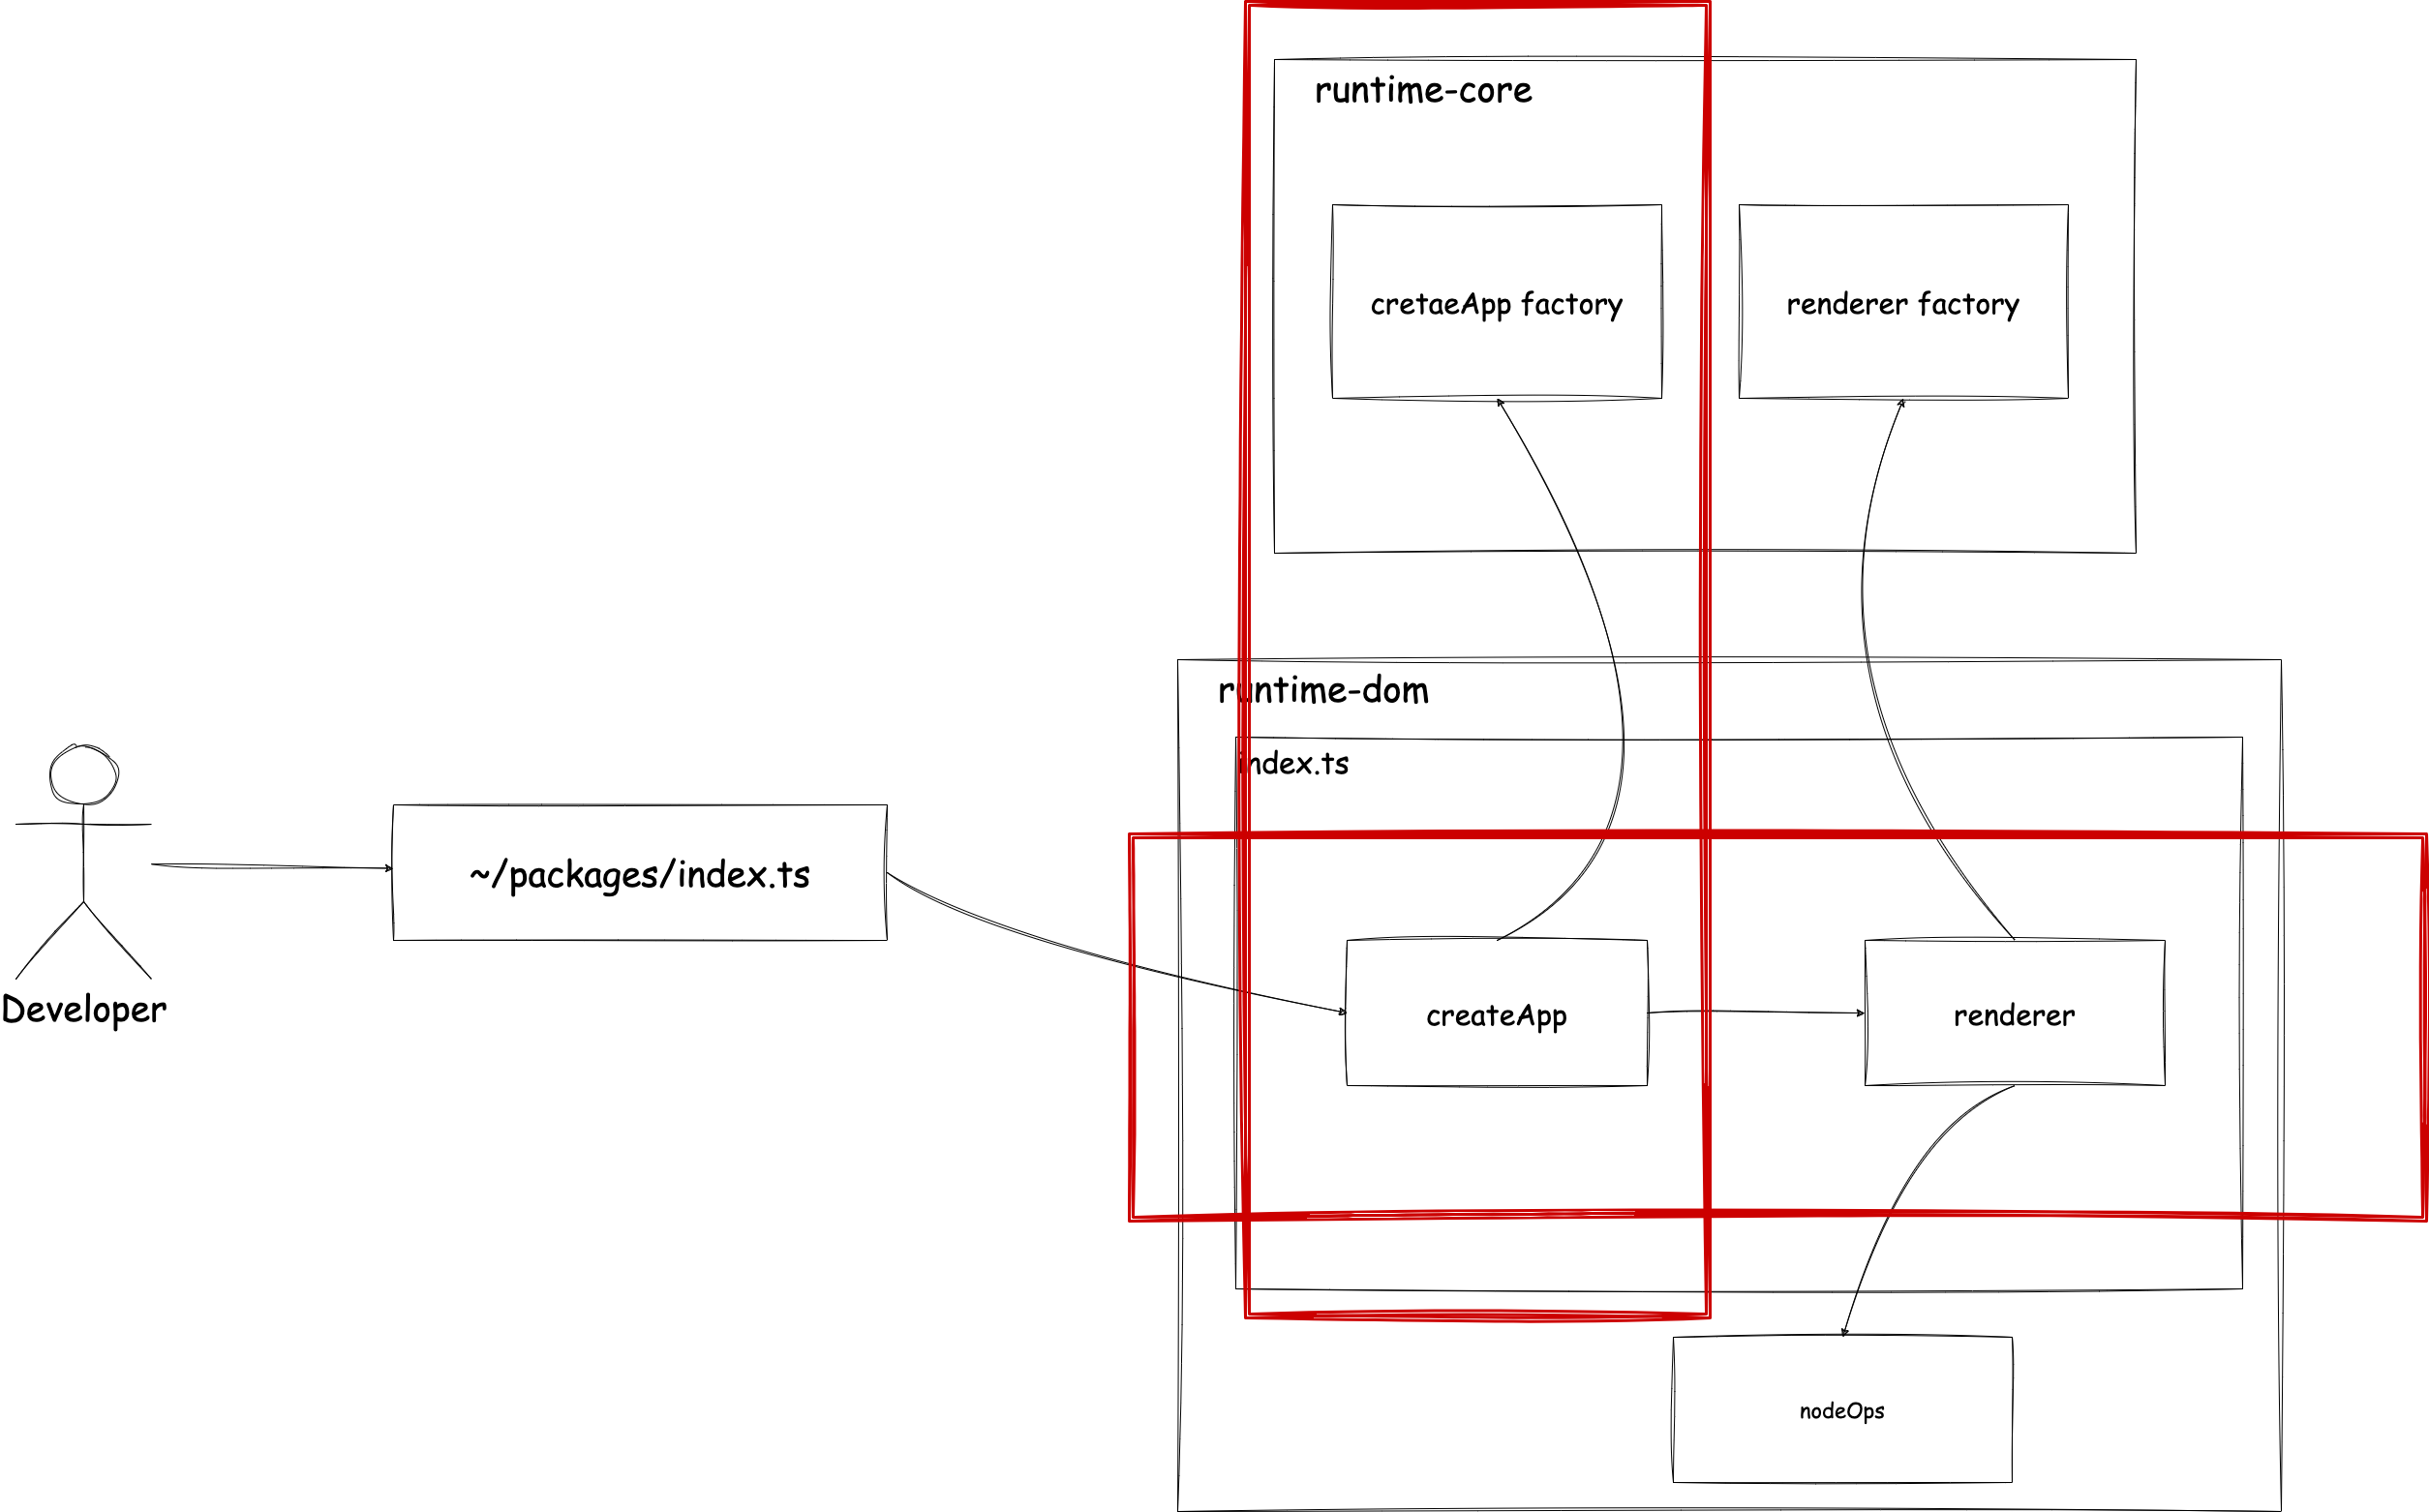
現在,讓我們回到實現.現在渲染器已經生成,我們需要做的就是考慮以下圖表中的紅色區域.

然而,這是一個簡單的任務.我們只需要實現 createApp 的工廠函數,以便它可以接受我們之前創建的渲染器.
// ~/packages/runtime-core apiCreateApp.ts

import { Component } from './component'
import { RootRenderFunction } from './renderer'

export interface App<HostElement = any> {
  mount(rootContainer: HostElement | string): void
}

export type CreateAppFunction<HostElement> = (
  rootComponent: Component,
) => App<HostElement>

export function createAppAPI<HostElement>(
  render: RootRenderFunction<HostElement>,
): CreateAppFunction<HostElement> {
  return function createApp(rootComponent) {
    const app: App = {
      mount(rootContainer: HostElement) {
        const message = rootComponent.render!()
        render(message, rootContainer)
      },
    }

    return app
  }
}// ~/packages/runtime-dom/index.ts
import {
CreateAppFunction,
createAppAPI,
createRenderer,
} from '../runtime-core'
import { nodeOps } from './nodeOps'
const { render } = createRenderer(nodeOps)
const _createApp = createAppAPI(render)
export const createApp = ((...args) => {
const app = _createApp(...args)
const { mount } = app
app.mount = (selector: string) => {
const container = document.querySelector(selector)
if (!container) return
mount(container)
}
return app
}) as CreateAppFunction<Element>我將類型移動到了 ~/packages/runtime-core/component.ts,但這並不重要,所以請參考源代碼(這只是與原始 Vue.js 對齊).
現在我們更接近原始 Vue.js 的源代碼,讓我們測試一下.如果消息仍然顯示,那就沒問題.
到此為止的源代碼: chibivue (GitHub)
