transformExpression
要實現的開發者介面和當前挑戰
首先,看看這個組件.
<script>
import { ref } from 'chibivue'

export default {
  setup() {
    const count = ref(0)
    const increment = () => {
      count.value++
    }
    return { count, increment }
  },
}
</script>

<template>
  <div>
    <button :onClick="increment">count + count is: {{ count + count }}</button>
  </div>
</template>
這個組件有幾個問題.
由於這個組件是用 SFC 編寫的,沒有使用 with 語句.
換句話說,綁定沒有正常工作.
讓我們看看編譯後的程式碼.
const _sfc_main = {
  setup() {
    const count = ref(0)
    const increment = () => {
      count.value++
    }
    return { count, increment }
  },
}

function render(_ctx) {
  const { h, mergeProps, normalizeProps, normalizeClass, normalizeStyle } =
    ChibiVue

  return h('div', null, [
    '\n    ',
    h('button', normalizeProps({ onClick: increment }), [
      'count + count is: ',
      _ctx.count + count,
    ]),
    '\n  ',
  ])
}

export default { ..._sfc_main, render }- 問題 1:註冊為事件處理器的
increment無法存取_ctx.
這是因為在之前的v-bind實現中沒有添加前綴. - 問題 2:表達式
count + count無法存取_ctx.
關於 mustache 語法,它只在開頭添加_ctx.,無法處理其他識別符.
因此,表達式中出現的所有識別符都需要加上_ctx.前綴.這適用於所有部分,不僅僅是 mustache.
看起來需要一個過程來為表達式中出現的識別符添加 _ctx..
期望的編譯結果
const _sfc_main = {
  setup() {
    const count = ref(0)
    const increment = () => {
      count.value++
    }
    return { count, increment }
  },
}

function render(_ctx) {
  const { h, mergeProps, normalizeProps, normalizeClass, normalizeStyle } =
    ChibiVue

  return h('div', null, [
    '\n    ',
    h('button', normalizeProps({ onClick: _ctx.increment }), [
      'count + count is: ',
      _ctx.count + _ctx.count,
    ]),
    '\n  ',
  ])
}

export default { ..._sfc_main, render }
WARNING
實際上,原始實現採用了稍微不同的方法.
如下所示,在原始實現中,從 setup 函式綁定的任何內容都透過 $setup 解析.
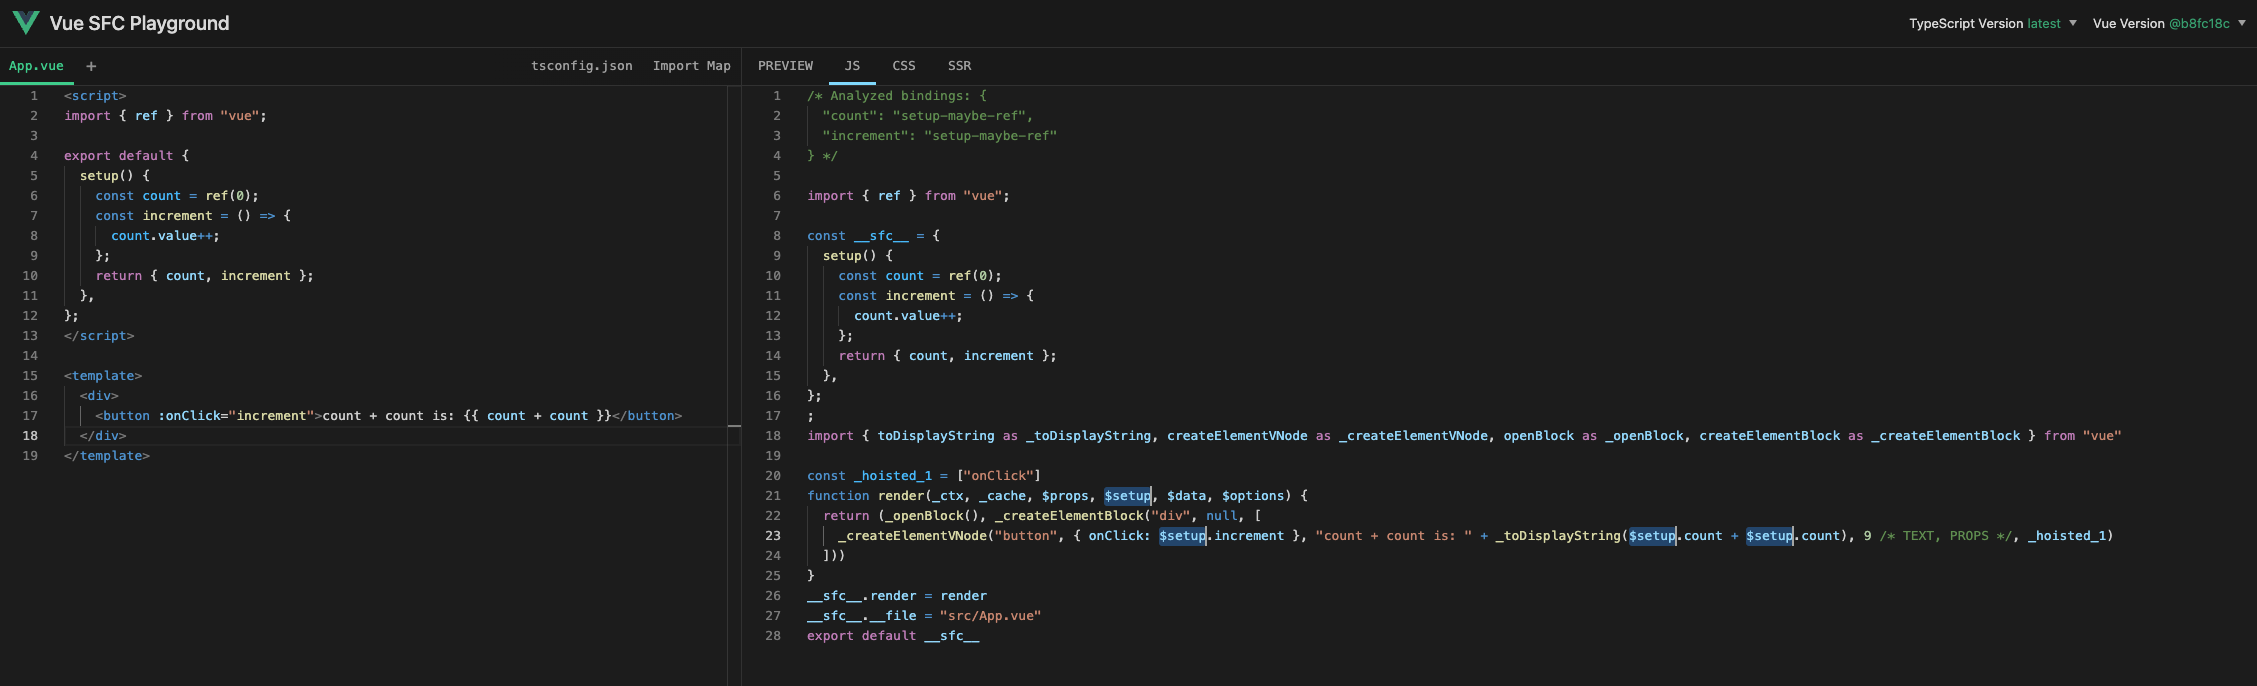
然而,實現這個有點困難,所以我們將簡化它並透過添加 _ctx. 來實現.(所有 props 和 setup 都將從 _ctx 解析)
實現方法
簡單來說,我們想要做的是"在 ExpressionNode 上的每個識別符(名稱)的開頭添加 _ctx.".
讓我更詳細地解釋一下.
作為回顧,程式透過解析被表示為 AST.
表示程式的 AST 主要有兩種類型的節點:Expression 和 Statement.
這些通常被稱為表達式和語句.
1 // 這是一個 Expression
ident // 這是一個 Expression
func() // 這是一個 Expression
ident + func() // 這是一個 Expression

let a // 這是一個 Statement
if (!a) a = 1 // 這是一個 Statement
for (let i = 0; i < 10; i++) a++ // 這是一個 Statement
我們這裡要考慮的是 Expression.
有各種類型的表達式.Identifier 是其中之一,它是由識別符表示的表達式.
(你可以將其視為一般的變數名)
Identifier 出現在表達式的各個地方.
1 // 無
ident // ident --- (1)
func() // func --- (2)
ident + func() // ident, func --- (3)
這樣,Identifier 出現在表達式的各個地方.
你可以透過在以下網站輸入程式來觀察 ExpressionNode 上的各種 Identifier,該網站允許你觀察 AST.
https://astexplorer.net/#/gist/670a1bee71dbd50bec4e6cc176614ef8/9a9ff250b18ccd9000ed253b0b6970696607b774
搜尋識別符
現在我們知道了我們想要做什麼,我們如何實現它?
看起來很困難,但實際上很簡單.我們將使用一個名為 estree-walker 的函式庫.
https://github.com/Rich-Harris/estree-walker
我們將使用這個函式庫來遍歷透過 babel 解析獲得的 AST.
用法非常簡單.只需將 AST 傳遞給 walk 函式,並將每個 Node 的處理描述為第二個參數.
這個 walk 函式逐個節點遍歷 AST,到達該 Node 時的處理透過 enter 選項完成.
除了 enter,還有像 leave 這樣的選項來在該 Node 結束時處理.我們這次只使用 enter.
創建一個名為 compiler-core/babelUtils.ts 的新檔案,並實現可以對 Identifier 執行操作的實用函式.
首先,安裝 estree-walker.
npm install estree-walker

npm install -D @babel/types # 也安裝這個import { Identifier, Node } from '@babel/types'
import { walk } from 'estree-walker'
export function walkIdentifiers(
root: Node,
onIdentifier: (node: Identifier) => void,
) {
;(walk as any)(root, {
enter(node: Node) {
if (node.type === 'Identifier') {
onIdentifier(node)
}
},
})
}然後,為表達式生成 AST 並將其傳遞給此函式,在重寫節點的同時執行轉換.
transformExpression 的實現
InterpolationNode 的 AST 和解析器更改
我們將實現轉換過程的主體 transformExpression.
首先,我們將修改 InterpolationNode,使其具有 SimpleExpressionNode 而不是字串作為其內容.
export interface InterpolationNode extends Node {
  type: NodeTypes.INTERPOLATION
  content: string
  content: ExpressionNode
}
透過這個更改,我們還需要修改 parseInterpolation.
function parseInterpolation(
  context: ParserContext,
): InterpolationNode | undefined {
  // .
  // .
  // .
  return {
    type: NodeTypes.INTERPOLATION,
    content: {
      type: NodeTypes.SIMPLE_EXPRESSION,
      isStatic: false,
      content,
      loc: getSelection(context, innerStart, innerEnd),
    },
    loc: getSelection(context, start),
  }
}
轉換器的實現(主體)
為了使表達式轉換在其他轉換器中可用,我們將其提取為名為 processExpression 的函式. 在 transformExpression 中,我們將處理 INTERPOLATION 和 DIRECTIVE 的 ExpressionNode.
export const transformExpression: NodeTransform = node => {
  if (node.type === NodeTypes.INTERPOLATION) {
    node.content = processExpression(node.content as SimpleExpressionNode)
  } else if (node.type === NodeTypes.ELEMENT) {
    for (let i = 0; i < node.props.length; i++) {
      const dir = node.props[i]
      if (dir.type === NodeTypes.DIRECTIVE) {
        const exp = dir.exp
        const arg = dir.arg
        if (exp && exp.type === NodeTypes.SIMPLE_EXPRESSION) {
          dir.exp = processExpression(exp)
        }
        if (arg && arg.type === NodeTypes.SIMPLE_EXPRESSION && !arg.isStatic) {
          dir.arg = processExpression(arg)
        }
      }
    }
  }
}

export function processExpression(node: SimpleExpressionNode): ExpressionNode {
  // TODO:
}
接下來,讓我們解釋 processExpression 的實現. 首先,我們將實現一個名為 rewriteIdentifier 的函式來重寫 node 內的 Identifier. 如果 node 是單個 Identifier,我們簡單地應用此函式並返回它.
需要注意的一點是,這個 processExpression 特定於 SFC(單檔案組件)情況(不使用 with 語句的情況). 換句話說,如果設置了 isBrowser 標誌,我們實現它簡單地返回 node. 我們修改實現以透過 ctx 接收標誌.
另外,我想保留像 true 和 false 這樣的字面量,所以我將為字面量創建一個白名單.
export function processExpression(
  node: SimpleExpressionNode,
  ctx: TransformContext,
): ExpressionNode {
  if (ctx.isBrowser) {
    // 對瀏覽器不做任何處理
    return node
  }

  const rawExp = node.content

  const rewriteIdentifier = (raw: string) => {
    return `_ctx.${raw}`
  }

  if (isSimpleIdentifier(rawExp)) {
    node.content = rewriteIdentifier(rawExp)
    return node
  }

  // TODO:
}
makeMap 是在 vuejs/core 中實現的用於存在性檢查的輔助函式,它返回一個布林值,指示是否與用逗號分隔定義的字串匹配.
export function makeMap(
  str: string,
  expectsLowerCase?: boolean,
): (key: string) => boolean {
  const map: Record<string, boolean> = Object.create(null)
  const list: Array<string> = str.split(',')
  for (let i = 0; i < list.length; i++) {
    map[list[i]] = true
  }
  return expectsLowerCase ? val => !!map[val.toLowerCase()] : val => !!map[val]
}
問題在於下一步,即如何轉換 SimpleExpressionNode(不是簡單的 Identifier)並轉換節點. 在以下討論中,請注意我們將處理兩個不同的 AST:Babel 生成的 JavaScript AST 和 chibivue 定義的 AST. 為了避免混淆,我們在本章中將前者稱為 estree,後者稱為 AST.
策略分為兩個階段.
- 在收集節點的同時替換 estree 節點
- 基於收集的節點構建 AST
首先,讓我們從階段 1 開始. 這相對簡單.如果我們可以用 Babel 解析原始 SimpleExpressionNode 內容(字串)並獲得 estree,我們可以透過我們之前創建的實用函式傳遞它並應用 rewriteIdentifier. 此時,我們收集 estree 節點.
import { parse } from '@babel/parser'
import { Identifier } from '@babel/types'
import { walkIdentifiers } from '../babelUtils'

interface PrefixMeta {
  start: number
  end: number
}

export function processExpression(
  node: SimpleExpressionNode,
  ctx: TransformContext,
): ExpressionNode {
  // .
  // .
  // .
  const ast = parse(`(${rawExp})`).program // ※ 這個 ast 指的是 estree。
  type QualifiedId = Identifier & PrefixMeta
  const ids: QualifiedId[] = []

  walkIdentifiers(ast, node => {
    node.name = rewriteIdentifier(node.name)
    ids.push(node as QualifiedId)
  })

  // TODO:
}
需要注意的一點是,到目前為止,我們只操作了 estree,沒有操作 ast 節點.
CompoundExpression
接下來,讓我們進入階段 2.在這裡,我們將定義一個名為 CompoundExpressionNode 的新 AST Node. Compound 意味著"組合"或"複雜性".這個 Node 有 children,它們採用稍微特殊的值. 首先,讓我們看看 AST 的定義.
export interface CompoundExpressionNode extends Node {
  type: NodeTypes.COMPOUND_EXPRESSION
  children: (
    | SimpleExpressionNode
    | CompoundExpressionNode
    | InterpolationNode
    | TextNode
    | string
  )[]
}
Children 採用如上所示的陣列. 要理解這個 Node 中的 children 代表什麼,看具體例子會更容易,所以讓我們給出一些例子.
以下表達式將被解析為以下 CompoundExpressionNode:
count * 2{
"type": 7,
"children": [
{
"type": 4,
"isStatic": false,
"content": "_ctx.count"
},
" * 2"
]
}這是一種相當奇怪的感覺."children" 採用字串類型的原因是因為它採用這種形式. 在 CompoundExpression 中,Vue 編譯器將其分為必要的粒度,並部分表示為字串或部分表示為 Node. 具體來說,在像這樣重寫 Expression 中存在的 Identifier 的情況下,只有 Identifier 部分被分為另一個 SimpleExpressionNode.
換句話說,我們要做的是基於收集的 estree 的 Identifier Node 和源生成這個 CompoundExpression. 以下程式碼是為此的實現.
export function processExpression(node: SimpleExpressionNode): ExpressionNode {
  // .
  // .
  // .
  const children: CompoundExpressionNode['children'] = []
  ids.sort((a, b) => a.start - b.start)
  ids.forEach((id, i) => {
    const start = id.start - 1
    const end = id.end - 1
    const last = ids[i - 1]
    const leadingText = rawExp.slice(last ? last.end - 1 : 0, start)
    if (leadingText.length) {
      children.push(leadingText)
    }

    const source = rawExp.slice(start, end)
    children.push(
      createSimpleExpression(id.name, false, {
        source,
        start: advancePositionWithClone(node.loc.start, source, start),
        end: advancePositionWithClone(node.loc.start, source, end),
      }),
    )
    if (i === ids.length - 1 && end < rawExp.length) {
      children.push(rawExp.slice(end))
    }
  })

  let ret
  if (children.length) {
    ret = createCompoundExpression(children, node.loc)
  } else {
    ret = node
  }

  return ret
}
Babel 解析的 Node 有 start 和 end(它對應於原始字串的位置資訊),所以我們基於此從 rawExp 中提取相應的部分並仔細分割. 請仔細查看原始碼了解更多詳細資訊.如果你理解到目前為止的策略,你應該能夠閱讀它.(另外,請查看 advancePositionWithClone 等的實現,因為它們是新實現的.)
現在我們可以生成 CompoundExpressionNode,讓我們也在 Codegen 中支援它.
function genInterpolation(
  node: InterpolationNode,
  context: CodegenContext,
  option: Required<CompilerOptions>,
) {
  genNode(node.content, context, option)
}

function genCompoundExpression(
  node: CompoundExpressionNode,
  context: CodegenContext,
  option: Required<CompilerOptions>,
) {
  for (let i = 0; i < node.children!.length; i++) {
    const child = node.children![i]
    if (isString(child)) {
      // 如果是字串,按原樣推送
      context.push(child)
    } else {
      // 對於其他任何內容,為 Node 生成 codegen
      genNode(child, context, option)
    }
  }
}
(genInterpolation 已經變成了只是 genNode,但我現在將保留它.)
試試看
現在我們已經實現到這裡,讓我們完成編譯器並嘗試執行它!
// 添加 transformExpression
export function getBaseTransformPreset(): TransformPreset {
  return [[transformElement], { bind: transformBind }]
  return [[transformExpression, transformElement], { bind: transformBind }]
}import { createApp, defineComponent, ref } from 'chibivue'
const App = defineComponent({
setup() {
const count = ref(3)
const getMsg = (count: number) => `Count: ${count}`
return { count, getMsg }
},
template: `
<div class="container">
<p> {{ 'Message is "' + getMsg(count) + '"'}} </p>
</div>
`,
})
const app = createApp(App)
app.mount('#app')到此為止的原始碼:GitHub