
我想使用基於元件的方法進行開發

元件是一種將 UI 拆分為可重複使用部分的機制。不必重複編寫同一個按鈕,只要定義一次就能重複使用!
基於整理現有實作的思考
到目前為止,我們已經小規模地實作了 createApp API,響應式系統和虛擬 DOM 系統。
透過目前的實作,我們可以使用響應式系統動態更改 UI,並使用虛擬 DOM 系統執行高效渲染。
然而,作為開發者介面,所有內容都寫在 createAppAPI 中。
實際上,我想更多地分割檔案並實作通用元件以實作可重用性。
首先,讓我們回顧一下現有實作中目前混亂的部分。請查看 renderer.ts 中的 render 函式。
const render: RootRenderFunction = (rootComponent, container) => {
  const componentRender = rootComponent.setup!()

  let n1: VNode | null = null
  let n2: VNode = null!

  const updateComponent = () => {
    const n2 = componentRender()
    patch(n1, n2, container)
    n1 = n2
  }

  const effect = new ReactiveEffect(updateComponent)
  effect.run()
}
在 render 函式中,直接定義了關於根元件的資訊。
實際上,n1,n2,updateComponent 和 effect 對每個元件都存在。
事實上,從現在開始,我想在使用者端定義元件(在某種意義上是建構函式)並實例化它。
我希望實例具有 n1,n2 和 updateComponent 等屬性。
因此,讓我們考慮將這些封裝為元件實例。
讓我們在 ~/packages/runtime-core/component.ts 中定義一個叫做 ComponentInternalInstance 的東西。
這將是實例的型別。
export interface ComponentInternalInstance {
  type: Component // 原始使用者定義的元件(舊的 rootComponent(實際上不僅僅是根元件))
  vnode: VNode // 稍後解釋
  subTree: VNode // 舊的 n1
  next: VNode | null // 舊的 n2
  effect: ReactiveEffect // 舊的 effect
  render: InternalRenderFunction // 舊的 componentRender
  update: () => void // 舊的 updateComponent
  isMounted: boolean
}

export type InternalRenderFunction = {
  (): VNodeChild
}
這個實例擁有的 vnode,subTree 和 next 屬性有點複雜,但從現在開始,我們將實作它,以便可以將 ConcreteComponent 指定為 VNode 的型別。
在 instance.vnode 中,我們將保留 VNode 本身。
而 subTree 和 next 將儲存該元件的渲染結果 VNode。(這與之前的 n1 和 n2 相同)
在圖像方面,
const MyComponent = {
  setup() {
    return h('p', {}, ['hello'])
  },
}

const App = {
  setup() {
    return h(MyComponent, {}, [])
  },
}
您可以像這樣使用它,如果讓實例成為 MyComponent 的實例,instance.vnode 將儲存 h(MyComponent, {}, []) 的結果,instance.subTree 將儲存 h("p", {}, ["hello"]) 的結果。
現在,讓我們實作它,以便您可以將元件指定為 h 函式的第一個參數。
但是,這只是接收定義元件的物件作為型別的問題。
在 ~/packages/runtime-core/vnode.ts 中
export type VNodeTypes = string | typeof Text | object // 加入 object;在 ~/packages/runtime-core/h.ts 中
export function h(
  type: string | object, // 加入 object
  props: VNodeProps
) {..}
讓我們也確保 VNode 有一個元件實例。
export interface VNode<HostNode = any> {
  // .
  // .
  // .
  component: ComponentInternalInstance | null // 加入
}
因此,渲染器也需要處理元件。
實作類似於 processElement 和 processText 的 processComponent 來處理元件,並且還實作 mountComponent 和 patchComponent(或 updateComponent)。
首先,讓我們從概述和詳細說明開始。
const patch = (n1: VNode | null, n2: VNode, container: RendererElement) => {
  const { type } = n2
  if (type === Text) {
    processText(n1, n2, container)
  } else if (typeof type === 'string') {
    processElement(n1, n2, container)
  } else if (typeof type === 'object') {
    // 加入分支
    processComponent(n1, n2, container)
  } else {
    // do nothing
  }
}

const processComponent = (
  n1: VNode | null,
  n2: VNode,
  container: RendererElement,
) => {
  if (n1 == null) {
    mountComponent(n2, container)
  } else {
    updateComponent(n1, n2)
  }
}

const mountComponent = (initialVNode: VNode, container: RendererElement) => {
  // TODO:
}

const updateComponent = (n1: VNode, n2: VNode) => {
  // TODO:
}
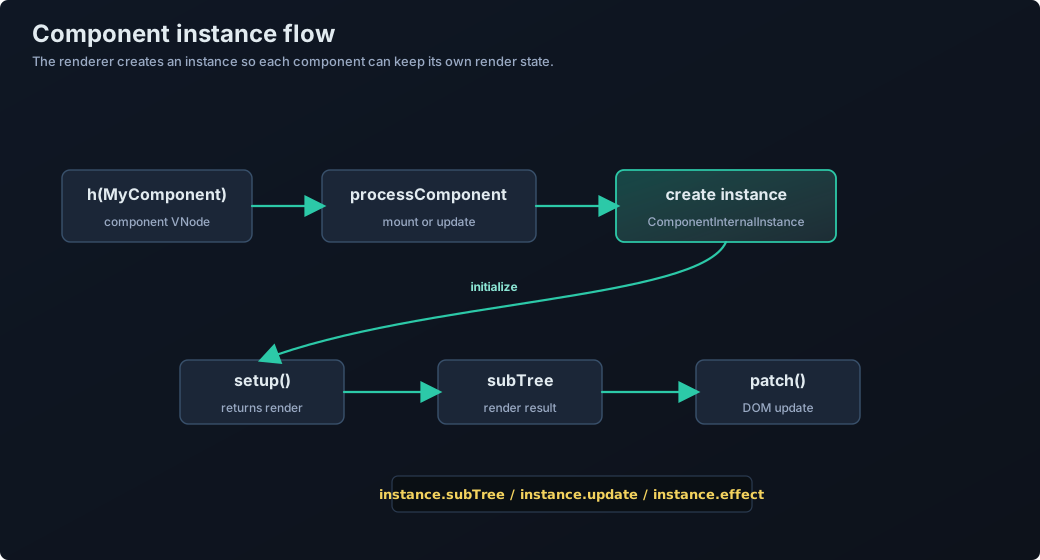
現在,讓我們看看 mountComponent。有三件事要做。
- 建立元件的實例。
- 執行
setup函式並將結果儲存在實例中。 - 建立
ReactiveEffect並將其儲存在實例中。
首先,讓我們在 component.ts 中實作一個函式來建立元件的實例(類似於建構函式)。
export function createComponentInstance(
  vnode: VNode,
): ComponentInternalInstance {
  const type = vnode.type as Component

  const instance: ComponentInternalInstance = {
    type,
    vnode,
    next: null,
    effect: null!,
    subTree: null!,
    update: null!,
    render: null!,
    isMounted: false,
  }

  return instance
}
雖然每個屬性的型別都是非空的,但我們在建立實例時用 null 初始化它們(遵循原始 Vue.js 的設計)。
const mountComponent = (initialVNode: VNode, container: RendererElement) => {
  const instance: ComponentInternalInstance = (initialVNode.component =
    createComponentInstance(initialVNode))
  // TODO: setup component
  // TODO: setup effect
}
接下來是 setup 函式。
我們需要將之前直接在 render 函式中編寫的程式碼移動到這裡,並將結果儲存在實例中而不是使用變數。
const mountComponent = (initialVNode: VNode, container: RendererElement) => {
  const instance: ComponentInternalInstance = (initialVNode.component =
    createComponentInstance(initialVNode))

  const component = initialVNode.type as Component
  if (component.setup) {
    instance.render = component.setup() as InternalRenderFunction
  }

  // TODO: setup effect
}
最後,讓我們將建立 effect 的程式碼合併到一個名為 setupRenderEffect 的函式中。
同樣,主要任務是將之前直接在 render 函式中實作的程式碼移動到這裡,同時利用實例的狀態。
const mountComponent = (initialVNode: VNode, container: RendererElement) => {
  const instance: ComponentInternalInstance = (initialVNode.component =
    createComponentInstance(initialVNode))

  const component = initialVNode.type as Component
  if (component.setup) {
    instance.render = component.setup() as InternalRenderFunction
  }

  setupRenderEffect(instance, initialVNode, container)
}

const setupRenderEffect = (
  instance: ComponentInternalInstance,
  initialVNode: VNode,
  container: RendererElement,
) => {
  const componentUpdateFn = () => {
    const { render } = instance

    if (!instance.isMounted) {
      // mount process
      const subTree = (instance.subTree = normalizeVNode(render()))
      patch(null, subTree, container)
      initialVNode.el = subTree.el
      instance.isMounted = true
    } else {
      // patch process
      let { next, vnode } = instance

      if (next) {
        next.el = vnode.el
        next.component = instance
        instance.vnode = next
        instance.next = null
      } else {
        next = vnode
      }

      const prevTree = instance.subTree
      const nextTree = normalizeVNode(render())
      instance.subTree = nextTree

      patch(prevTree, nextTree, hostParentNode(prevTree.el!)!) // ※ 1
      next.el = nextTree.el
    }
  }

  const effect = (instance.effect = new ReactiveEffect(componentUpdateFn))
  const update = (instance.update = () => effect.run()) // 註冊到 instance.update
  update()
}
※ 1: 請在 nodeOps 中實作一個名為 parentNode 的函式,用於檢索父 Node。
parentNode: (node) => {
    return node.parentNode;
},
我認為這並不特別困難,儘管有點長。
在 setupRenderEffect 函式中,更新函式被註冊為實例的 update 方法,所以在 updateComponent 中,我們只需要呼叫該函式。
const updateComponent = (n1: VNode, n2: VNode) => {
  const instance = (n2.component = n1.component)!
  instance.next = n2
  instance.update()
}
最後,由於到目前為止在 render 函式中定義的實作不再需要,我們將刪除它。
const render: RootRenderFunction = (rootComponent, container) => {
  const vnode = createVNode(rootComponent, {}, [])
  patch(null, vnode, container)
}
現在我們可以渲染元件了。讓我們嘗試建立一個 playground 元件作為示例。
透過這種方式,我們可以將渲染分為元件。

元件的「藍圖」和「實例」是兩回事。即使連續放置三個相同的 CounterComponent,每個實例也會擁有彼此獨立的狀態!
import { createApp, h, reactive } from 'chibivue'

const CounterComponent = {
  setup() {
    const state = reactive({ count: 0 })
    const increment = () => state.count++

    return () =>
      h('div', {}, [
        h('p', {}, [`count: ${state.count}`]),
        h('button', { onClick: increment }, ['increment']),
      ])
  },
}

const app = createApp({
  setup() {
    return () =>
      h('div', { id: 'my-app' }, [
        h(CounterComponent, {}, []),
        h(CounterComponent, {}, []),
        h(CounterComponent, {}, []),
      ])
  },
})

app.mount('#app')
現在你已經可以把 UI 元件化了!這套機制在實際應用程式開發中不可或缺。
到此為止的原始碼: chibivue (GitHub)