資料綁定
想要綁定到模板
目前,我們直接操作 DOM,因此無法利用響應式系統或虛擬 DOM.
實際上,我們希望在模板部分編寫事件處理程式和文字內容.這就是宣告式 UI 的樂趣所在.
我們的目標是實現如下的開發者介面.
import { createApp, reactive, h } from 'chibivue'

const app = createApp({
  setup() {
    const state = reactive({ message: 'Hello, chibivue!' })
    const changeMessage = () => {
      state.message += '!'
    }

    return { state, changeMessage }
  },

  render() {
    return h('div', { class: 'container', style: 'text-align: center' }, [
      h('h2', {}, `message: ${this.state.message}`),
      h('img', {
        width: '150px',
        src: 'https://upload.wikimedia.org/wikipedia/commons/thumb/9/95/Vue.js_Logo_2.svg/1200px-Vue.js_Logo_2.svg.png',
      }),
      h('p', {}, [h('b', {}, 'chibivue'), ' is the minimal Vue.js']),
      h('button', { onclick: this.changeMessage }, 'click me!'),
      h(
        'style',
        {},
        `
        .container {
          height: 100vh;
          padding: 16px;
          background-color: #becdbe;
          color: #2c3e50;
        }
      `,
      ),
    ])
  },
})

app.mount('#app')
現在,我想能夠在模板中處理從 setup 函式返回的值.
從現在開始,我將把這稱為「模板綁定」或簡稱「綁定」.
我將實現綁定,但在實現事件處理程式和 mustache 語法之前,有幾件事我想做.
我提到了從 setup 返回的值,但目前 setup 的返回值要麼是 undefined,要麼是一個函式(渲染函式).
作為實現綁定的準備,我需要修改它,使 setup 可以返回狀態和其他值,並且這些值可以作為組件資料儲存.
export type ComponentOptions = {
  setup?: (
    props: Record<string, any>,
    ctx: { emit: (event: string, ...args: any[]) => void },
  ) => Function | Record<string, unknown> | void
  // 允許返回 Record<string, unknown>
  // .
  // .
  // .
}export interface ComponentInternalInstance {
// .
// .
// .
setupState: Data // 將 setup 的結果作為物件儲存在這裡
}export const setupComponent = (instance: ComponentInternalInstance) => {
const { props } = instance.vnode
initProps(instance, props)
const component = instance.type as Component
if (component.setup) {
const setupResult = component.setup(instance.props, {
emit: instance.emit,
}) as InternalRenderFunction
// 根據 setupResult 的類型進行分支
if (typeof setupResult === 'function') {
instance.render = setupResult
} else if (typeof setupResult === 'object' && setupResult !== null) {
instance.setupState = setupResult
} else {
// do nothing
}
}
// .
// .
// .
}從現在開始,我將把在 setup 中定義的資料稱為 setupState.
現在,在實現編譯器之前,讓我們思考如何將 setupState 綁定到模板.
之前,我們這樣綁定 setupState:
const app = createApp({
  setup() {
    const state = reactive({ message: 'hello' })
    return () => h('div', {}, [state.message])
  },
})
嗯,這實際上不是真正的綁定,而是渲染函式簡單地形成閉包並引用變數.
然而,這次,由於 setup 選項和渲染函式在概念上是不同的,我們需要找到一種方法將 setup 資料傳遞給渲染函式.
const app = createApp({
  setup() {
    const state = reactive({ message: 'hello' })
    return { state }
  },

  // 這將被轉換為渲染函式
  template: '<div>{{ state.message }}</div>',
})
template 使用 h 函式編譯為渲染函式並分配給 instance.render.
因此,它等價於以下程式碼:
const app = createApp({
  setup() {
    const state = reactive({ message: 'hello' })
    return { state }
  },

  render() {
    return h('div', {}, [state.message])
  },
})
自然地,變數 state 在渲染函式內部沒有定義.
現在,我們如何引用 state 變數?
使用 with 語句
總之,我們可以使用 with 語句來實現所需的結果:
const app = createApp({
  setup() {
    const state = reactive({ message: 'hello' })
    return { state }
  },

  render(ctx) {
    with (ctx) {
      return h('div', {}, [state.message])
    }
  },
})
我相信有很多人不熟悉 with 語句.
這是有充分理由的,這個功能已被棄用.
根據 MDN:
雖然仍然被一些瀏覽器支援,但它已從 Web 標準中棄用。但是,它可能仍在用於各種目的,例如與遺留程式碼的相容性。避免使用它,如果可能的話更新現有程式碼。
因此,建議避免使用它.
我們不知道 Vue.js 的實現將來會如何變化,但由於 Vue.js 3 使用 with 語句,我們將在此實現中使用它.
稍微說一下,Vue.js 中並非所有內容都使用 with 語句實現.
在處理單檔案組件(SFC)中的模板時,它是在不使用 with 語句的情況下實現的.
我們將在後面的章節中介紹這一點,但現在,讓我們考慮使用 with 來實現它.
現在,讓我們回顧一下 with 語句的行為. with 語句擴展語句的作用域鏈.
它的行為如下:
const obj = { a: 1, b: 2 }

with (obj) {
  console.log(a, b) // 1, 2
}
通過將包含 state 的父物件作為參數傳遞給 with,我們可以引用 state 變數.
在這種情況下,我們將把 setupState 視為父物件.
實際上,不僅是 setupState,來自 props 的資料和在 Options API 中定義的資料也應該是可存取的.
但是,現在,我們只考慮使用來自 setupState 的資料. (我們將在後面的部分中介紹這部分的實現,因為它不是最小實現的一部分.)
總結我們這次想要實現的內容,我們想要編譯以下模板:
<div>
  <p>{{ state.message }}</p>
  <button @click="changeMessage">click me</button>
</div>
轉換為以下函式:
_ctx => {
  with (_ctx) {
    return h('div', {}, [
      h('p', {}, [state.message]),
      h('button', { onClick: changeMessage }, ['click me']),
    ])
  }
}
並將 setupState 傳遞給這個函式:
const setupState = setup()
render(setupState)
實現 Mustache 語法
首先,讓我們實現 Mustache 語法.
像往常一樣,我們將考慮 AST,實現解析器,然後實現程式碼生成器.
目前,作為 AST 一部分定義的唯一節點是 Element,Text 和 Attribute.
由於我們想要定義 Mustache 語法,直覺上有一個叫做 Mustache 的 AST 是有意義的.
為此,我們將使用 Interpolation 節點.
Interpolation 有「插值」或「插入」等含義.
因此,我們這次將處理的 AST 將如下所示:
export const enum NodeTypes {
  ELEMENT,
  TEXT,
  INTERPOLATION, // 添加
}

export type TemplateChildNode = ElementNode | TextNode | InterpolationNode // 添加 InterpolationNode

export interface InterpolationNode extends Node {
  type: NodeTypes.INTERPOLATION
  content: string // Mustache 內部編寫的內容(在這種情況下,在 setup 中定義的單個變數名將放在這裡)
}
現在 AST 已經實現,讓我們繼續實現解析器.
當我們找到字串 {{ 時,我們將把它解析為 Interpolation.
function parseChildren(
  context: ParserContext,
  ancestors: ElementNode[]
): TemplateChildNode[] {
  const nodes: TemplateChildNode[] = [];

  while (!isEnd(context, ancestors)) {
    const s = context.source;
    let node: TemplateChildNode | undefined = undefined;

    if (startsWith(s, "{{")) { // 這裡
      node = parseInterpolation(context);
    } else if (s[0] === "<") {
      if (/[a-z]/i.test(s[1])) {
        node = parseElement(context, ancestors);
      }
    }
    // .
    // .
    //
}function parseInterpolation(
context: ParserContext,
): InterpolationNode | undefined {
const [open, close] = ['{{', '}}']
const closeIndex = context.source.indexOf(close, open.length)
if (closeIndex === -1) return undefined
const start = getCursor(context)
advanceBy(context, open.length)
const innerStart = getCursor(context)
const innerEnd = getCursor(context)
const rawContentLength = closeIndex - open.length
const rawContent = context.source.slice(0, rawContentLength)
const preTrimContent = parseTextData(context, rawContentLength)
const content = preTrimContent.trim()
const startOffset = preTrimContent.indexOf(content)
if (startOffset > 0) {
advancePositionWithMutation(innerStart, rawContent, startOffset)
}
const endOffset =
rawContentLength - (preTrimContent.length - content.length - startOffset)
advancePositionWithMutation(innerEnd, rawContent, endOffset)
advanceBy(context, close.length)
return {
type: NodeTypes.INTERPOLATION,
content,
loc: getSelection(context, start),
}
}有些情況下 {{ 出現在文字中,所以我們將對 parseText 進行一些修改.
function parseText(context: ParserContext): TextNode {
  const endTokens = ['<', '{{'] // 如果 <span v-pre>`{{`</span> 出現,parseText 結束

  let endIndex = context.source.length

  for (let i = 0; i < endTokens.length; i++) {
    const index = context.source.indexOf(endTokens[i], 1)
    if (index !== -1 && endIndex > index) {
      endIndex = index
    }
  }

  const start = getCursor(context)
  const content = parseTextData(context, endIndex)

  return {
    type: NodeTypes.TEXT,
    content,
    loc: getSelection(context, start),
  }
}
對於那些到目前為止已經實現了解析器的人來說,應該沒有特別困難的部分.
它只是搜尋 {{ 並讀取直到 }} 出現,生成 AST.
如果沒有找到 }},它返回 undefined 並在 parseText 的分支中將其解析為文字.
讓我們輸出到控制台或其他地方,以確保解析正常工作.
const app = createApp({
  setup() {
    const state = reactive({ message: 'Hello, chibivue!' })
    const changeMessage = () => {
      state.message += '!'
    }

    return { state, changeMessage }
  },
  template: `
    <div class="container" style="text-align: center">
      <h2>{{ state.message }}</h2>
      <img
        width="150px"
        src="https://upload.wikimedia.org/wikipedia/commons/thumb/9/95/Vue.js_Logo_2.svg/1200px-Vue.js_Logo_2.svg.png"
        alt="Vue.js Logo"
      />
      <p><b>chibivue</b> is the minimal Vue.js</p>

      <button> click me! </button>

      <style>
        .container {
          height: 100vh;
          padding: 16px;
          background-color: #becdbe;
          color: #2c3e50;
        }
      </style>
    </div>
  `,
})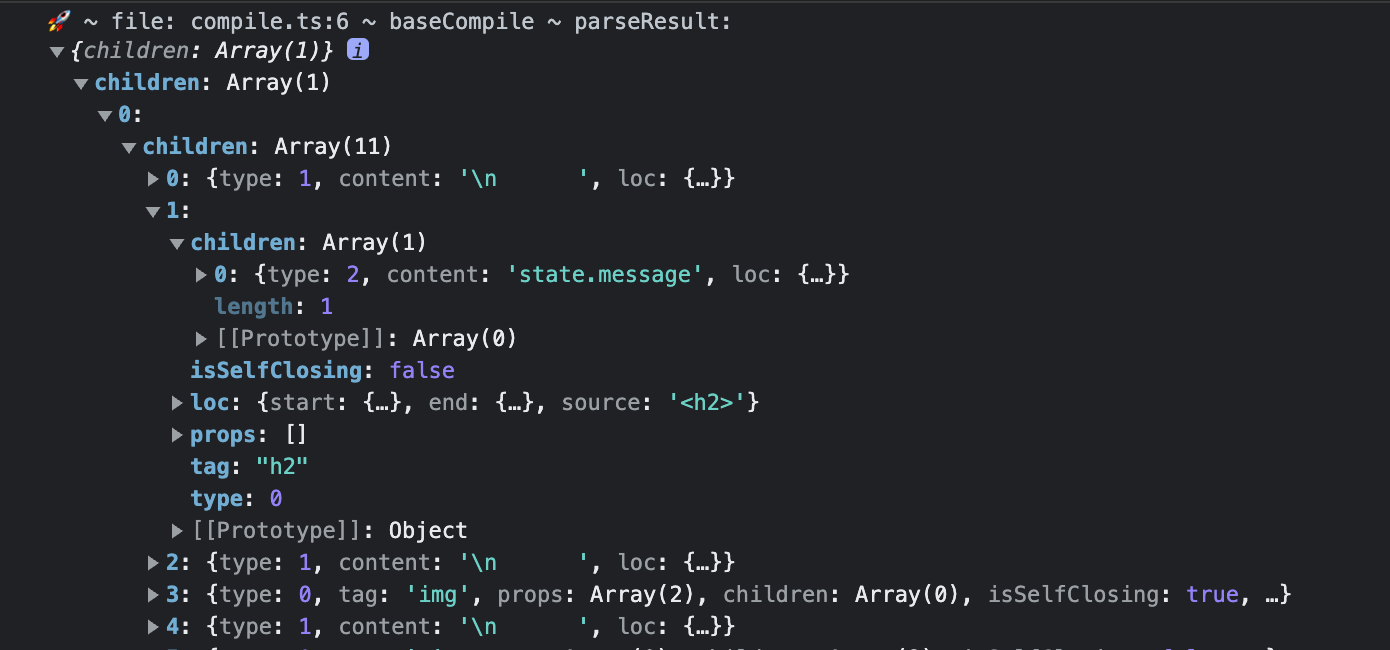
看起來不錯!
現在讓我們基於這個 AST 實現綁定.
用 with 語句包裝渲染函式的內容.
export const generate = ({
  children,
}: {
  children: TemplateChildNode[]
}): string => {
  return `return function render(_ctx) {
  with (_ctx) {
    const { h } = ChibiVue;
    return ${genNode(children[0])};
  }
}`
}

const genNode = (node: TemplateChildNode): string => {
  switch (node.type) {
    // .
    // .
    case NodeTypes.INTERPOLATION:
      return genInterpolation(node)
    // .
    // .
  }
}

const genInterpolation = (node: InterpolationNode): string => {
  return `${node.content}`
}
最後,在執行渲染函式時,將 setupState 作為參數傳遞.\
~/packages/runtime-core/component.ts
export type InternalRenderFunction = {
  (ctx: Data): VNodeChild // 接受 ctx 作為參數
}
~/packages/runtime-core/renderer.ts
const setupRenderEffect = (
  instance: ComponentInternalInstance,
  initialVNode: VNode,
  container: RendererElement,
) => {
  const componentUpdateFn = () => {
    const { render, setupState } = instance
    if (!instance.isMounted) {
      // .
      // .
      // .
      const subTree = (instance.subTree = normalizeVNode(render(setupState))) // 傳遞 setupState
      // .
      // .
      // .
    } else {
      // .
      // .
      // .
      const nextTree = normalizeVNode(render(setupState)) // 傳遞 setupState
      // .
      // .
      // .
    }
  }
}
如果你已經走到這一步,你應該能夠渲染了.讓我們檢查一下!
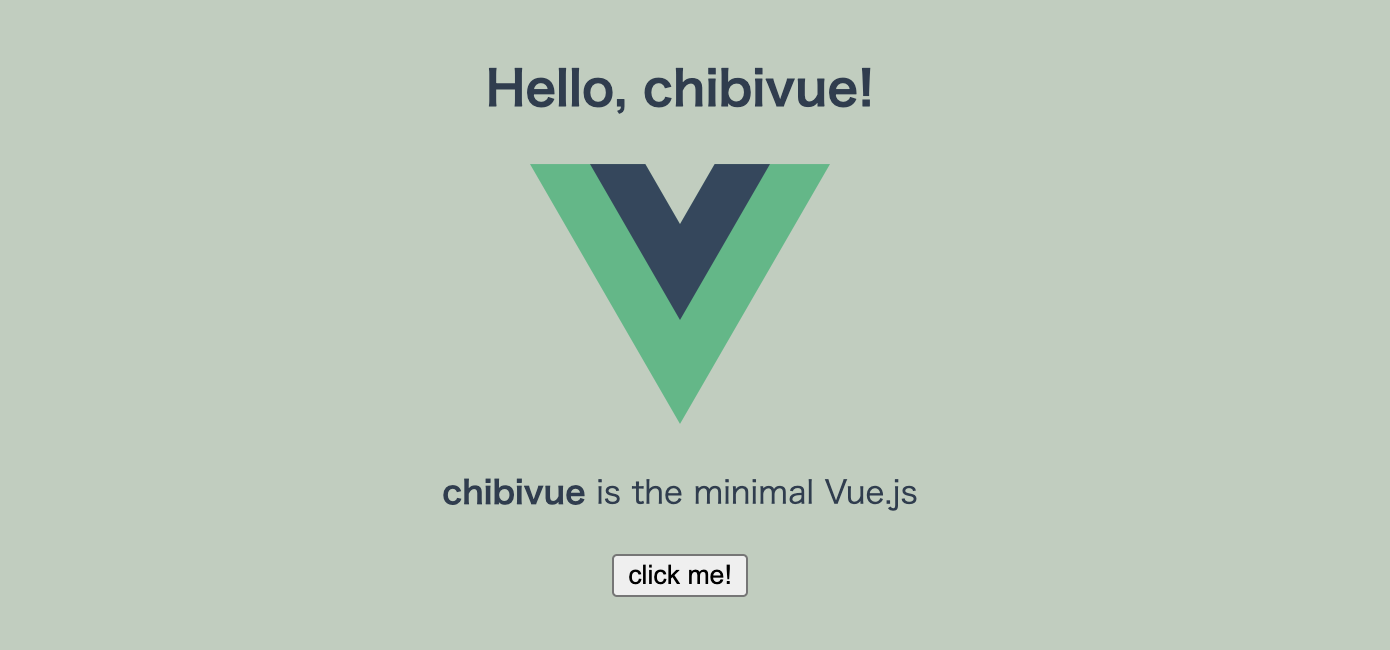
這完成了第一個綁定!
第一個指令
接下來是事件處理程式.
const genElement = (el: ElementNode): string => {
  return `h("${el.tag}", {${el.props
    .map(({ name, value }) =>
      // 如果是 @click,將 props 名稱轉換為 onClick
      name === '@click'
        ? `onClick: ${value?.content}`
        : `${name}: "${value?.content}"`,
    )
    .join(', ')}}, [${el.children.map(it => genNode(it)).join(', ')}])`
}
讓我們檢查操作.
const app = createApp({
  setup() {
    const state = reactive({ message: 'Hello, chibivue!' })
    const changeMessage = () => {
      state.message += '!'
    }

    return { state, changeMessage }
  },
  template: `
    <div class="container" style="text-align: center">
      <h2>{{ state.message }}</h2>
      <img
        width="150px"
        src="https://upload.wikimedia.org/wikipedia/commons/thumb/9/95/Vue.js_Logo_2.svg/1200px-Vue.js_Logo_2.svg.png"
        alt="Vue.js Logo"
      />
      <p><b>chibivue</b> is the minimal Vue.js</p>

      <button @click="changeMessage"> click me! </button>

      <style>
        .container {
          height: 100vh;
          padding: 16px;
          background-color: #becdbe;
          color: #2c3e50;
        }
      </style>
    </div>
  `,
})
你做到了!做得好!完成了!
我想這樣說,但實現還不夠乾淨,所以我想稍微重構一下.
由於 @click 被歸類為「指令」名稱,很容易想像將來實現 v-bind 和 v-model.
所以讓我們在 AST 中將其表示為 DIRECTIVE 並將其與簡單的 ATTRIBUTE 區分開來.
像往常一樣,讓我們按照 AST -> parse -> codegen 的順序實現它.
export const enum NodeTypes {
  ELEMENT,
  TEXT,
  INTERPOLATION,

  ATTRIBUTE,
  DIRECTIVE, // 添加
}

export interface ElementNode extends Node {
  type: NodeTypes.ELEMENT
  tag: string
  props: Array<AttributeNode | DirectiveNode> // props 是 AttributeNode 和 DirectiveNode 聯合的陣列
  // .
  // .
}

export interface DirectiveNode extends Node {
  type: NodeTypes.DIRECTIVE
  // 表示 `v-name:arg="exp"` 的格式。
  // 例如,對於 `v-on:click="increment"`,它將是 { name: "on", arg: "click", exp="increment" }
  name: string
  arg: string
  exp: string
}function parseAttribute(
context: ParserContext,
nameSet: Set<string>
): AttributeNode | DirectiveNode {
// 名稱。
const start = getCursor(context);
const match = /^[^\t\r\n\f />][^\t\r\n\f />=]*/.exec(context.source)!;
const name = match[0];
nameSet.add(name);
advanceBy(context, name.length);
// 值
let value: AttributeValue = undefined;
if (/^[\t\r\n\f ]*=/.test(context.source)) {
advanceSpaces(context);
advanceBy(context, 1);
advanceSpaces(context);
value = parseAttributeValue(context);
}
// --------------------------------------------------- 從這裡
// 指令
const loc = getSelection(context, start);
if (/^(v-[A-Za-z0-9-]|@)/.test(name)) {
const match =
/(?:^v-([a-z0-9-]+))?(?:(?::|^\.|^@|^#)(\[[^\]]+\]|[^\.]+))?(.+)?$/i.exec(
name
)!;
let dirName = match[1] || (startsWith(name, "@") ? "on" : "");
let arg = "";
if (match[2]) arg = match[2];
return {
type: NodeTypes.DIRECTIVE,
name: dirName,
exp: value?.content ?? "",
loc,
arg,
};
}
// --------------------------------------------------- 到這裡
// .
// .
// .const genElement = (el: ElementNode): string => {
return `h("${el.tag}", {${el.props
.map(prop => genProp(prop))
.join(', ')}}, [${el.children.map(it => genNode(it)).join(', ')}])`
}
const genProp = (prop: AttributeNode | DirectiveNode): string => {
switch (prop.type) {
case NodeTypes.ATTRIBUTE:
return `${prop.name}: "${prop.value?.content}"`
case NodeTypes.DIRECTIVE: {
switch (prop.name) {
case 'on':
return `${toHandlerKey(prop.arg)}: ${prop.exp}`
default:
// TODO: 其他指令
throw new Error(`unexpected directive name. got "${prop.name}"`)
}
}
default:
throw new Error(`unexpected prop type.`)
}
}現在,讓我們在遊樂場中檢查操作.
你應該能夠處理不僅 @click,還有 v-on:click 和其他事件.
const app = createApp({
  setup() {
    const state = reactive({ message: 'Hello, chibivue!', input: '' })

    const changeMessage = () => {
      state.message += '!'
    }

    const handleInput = (e: InputEvent) => {
      state.input = (e.target as HTMLInputElement)?.value ?? ''
    }

    return { state, changeMessage, handleInput }
  },

  template: `
    <div class="container" style="text-align: center">
      <h2>{{ state.message }}</h2>
      <img
        width="150px"
        src="https://upload.wikimedia.org/wikipedia/commons/thumb/9/95/Vue.js_Logo_2.svg/1200px-Vue.js_Logo_2.svg.png"
        alt="Vue.js Logo"
      />
      <p><b>chibivue</b> is the minimal Vue.js</p>

      <button @click="changeMessage"> click me! </button>

      <br />

      <label>
        Input Data
        <input @input="handleInput" />
      </label>

      <p>input value: {{ state.input }}</p>

      <style>
        .container {
          height: 100vh;
          padding: 16px;
          background-color: #becdbe;
          color: #2c3e50;
        }
      </style>
    </div>
  `,
})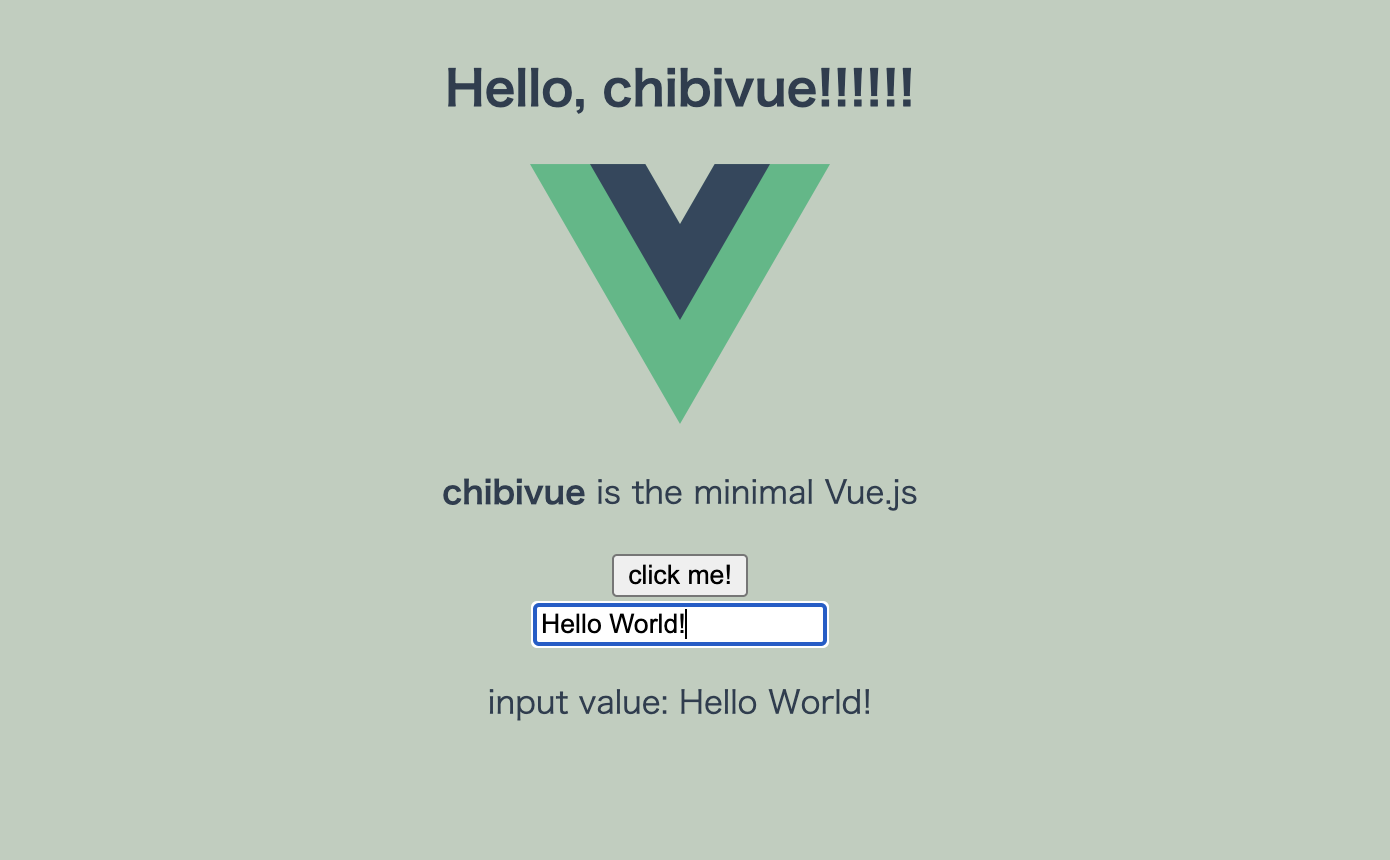
你做到了.
我們越來越接近 Vue 了!
有了這個,小模板的實現就完成了.做得好.
到此為止的原始碼: chibivue (GitHub)