key 屬性和補丁渲染(基礎虛擬DOM章節開始)
關鍵錯誤
實際上,當前 chibivue 的補丁渲染中存在一個關鍵錯誤.
在實現補丁渲染時,
關於 patchChildren,需要透過添加 key 等屬性來處理動態大小的子元素。
你還記得說過這句話嗎?
讓我們看看實際會發生什麼樣的問題. 在當前的實現中,patchChildren 是這樣實現的:
const patchChildren = (n1: VNode, n2: VNode, container: RendererElement) => {
  const c1 = n1.children as VNode[]
  const c2 = n2.children as VNode[]

  for (let i = 0; i < c2.length; i++) {
    const child = (c2[i] = normalizeVNode(c2[i]))
    patch(c1[i], child, container)
  }
}
這是基於 c2(即下一個 vnode)的長度進行循環的. 換句話說,它基本上只在 c1 和 c2 相同時才能正常工作.

例如,讓我們考慮元素被刪除的情況. 由於補丁循環基於 c2,第四個元素的補丁將不會被執行.

當變成這樣時,第一到第三個元素只是簡單地更新,而第四個元素仍然是來自 c1 的未被刪除的元素.
讓我們看看實際效果.
import { createApp, h, reactive } from 'chibivue'

const app = createApp({
  setup() {
    const state = reactive({ list: ['a', 'b', 'c', 'd'] })
    const updateList = () => {
      state.list = ['e', 'f', 'g']
    }

    return () =>
      h('div', { id: 'app' }, [
        h(
          'ul',
          {},
          state.list.map(item => h('li', {}, [item])),
        ),
        h('button', { onClick: updateList }, ['update']),
      ])
  },
})

app.mount('#app')
當你點擊更新按鈕時,應該是這樣的:
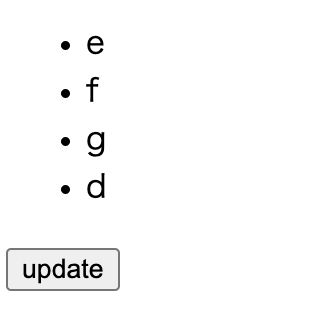
雖然列表應該已經更新為 ["e", "f", "g"],但 "d" 仍然存在.
實際上,問題不僅僅是這個.讓我們考慮元素被插入的情況. 目前,由於循環基於 c2,它變成這樣:

然而,實際上,"新元素"被插入了,比較應該在 c1 和 c2 的每個 li 1,li 2,li 3 和 li 4 之間進行.

這兩個問題的共同點是"無法確定 c1 和 c2 中需要被視為相同的節點".
為了解決這個問題,需要為元素分配一個 key,並基於該 key 進行補丁.
現在,讓我們看看 Vue 文件中對 key 屬性的解釋.
特殊屬性 key 主要用作 Vue 虛擬DOM演算法的提示,在比較新舊節點列表時識別 VNode。
https://v3-migration.vuejs.org/breaking-changes/key-attribute.html
正如預期的那樣,對吧?你可能聽過"不要使用索引作為 v-for 的 key"的建議,但在這一點上,key 被隱式設置為索引,這就是為什麼會出現上述問題.(循環基於 c2 的長度,並基於該索引進行補丁)
基於 key 屬性的補丁
實現這些功能的函式是 patchKeyedChildren.(讓我們在原始 Vue 中搜尋它.)
方法是首先為新節點生成 key 和索引的映射.
let i = 0
const l2 = c2.length
const e1 = c1.length - 1 // prev node 的結束索引
const e2 = l2 - 1 // next node 的結束索引

const s1 = i // prev node 的開始索引
const s2 = i // next node 的開始索引

const keyToNewIndexMap: Map<string | number | symbol, number> = new Map()
for (i = s2; i <= e2; i++) {
  const nextChild = (c2[i] = normalizeVNode(c2[i]))
  if (nextChild.key != null) {
    keyToNewIndexMap.set(nextChild.key, i)
  }
}
在原始 Vue 中,這個 patchKeyedChildren 分為五個部分:
- sync from start
- sync from end
- common sequence + mount
- common sequence + unmount
- unknown sequence
然而,最後一部分 unknown sequence 是唯一在功能上必需的,所以我們將從閱讀和實現該部分開始.
首先,忘記移動元素,基於 key 對 VNode 進行補丁. 使用我們之前創建的 keyToNewIndexMap,計算 n1 和 n2 的配對並對它們進行補丁. 此時,如果有新元素需要掛載或需要卸載,也要執行這些操作.
大致來說,它看起來像這樣 ↓(我跳過了很多細節.請閱讀 vuejs/core 的 renderer.ts 了解更多詳細資訊.)
const toBePatched = e2 + 1
const newIndexToOldIndexMap = new Array(toBePatched) // 新索引到舊索引的映射
for (i = 0; i < toBePatched; i++) newIndexToOldIndexMap[i] = 0

// 基於 e1(舊長度)的循環
for (i = 0; i <= e1; i++) {
  const prevChild = c1[i]
  newIndex = keyToNewIndexMap.get(prevChild.key)
  if (newIndex === undefined) {
    // 如果在新的中不存在,卸載它
    unmount(prevChild)
  } else {
    newIndexToOldIndexMap[newIndex] = i + 1 // 形成映射
    patch(prevChild, c2[newIndex] as VNode, container) // 補丁
  }
}

for (i = toBePatched - 1; i >= 0; i--) {
  const nextIndex = i
  const nextChild = c2[nextIndex] as VNode
  if (newIndexToOldIndexMap[i] === 0) {
    // 如果映射不存在(保持初始值),意味著它需要新掛載。(實際上,它存在但不在舊的中)
    patch(null, nextChild, container, anchor)
  }
}
移動元素
方法
Node.insertBefore
目前,我們只基於 key 匹配更新每個元素,所以如果元素被移動,我們需要編寫程式碼將其移動到所需位置.
首先,讓我們談談如何移動元素.我們在 nodeOps 的 insert 函式中指定錨點.錨點,顧名思義,是一個錨點,如果你查看在 runtime-dom 中實現的 insert 方法,你可以看到它是用 insertBefore 方法實現的.
export const nodeOps: Omit<RendererOptions, 'patchProp'> = {
  // .
  // .
  // .
  insert: (child, parent, anchor) => {
    parent.insertBefore(child, anchor || null)
  },
}
透過將節點作為第二個參數傳遞給此方法,節點將被插入到該節點之前.
https://developer.mozilla.org/en-US/docs/Web/API/Node/insertBefore
我們使用這個方法來實際移動 DOM.
LIS(最長遞增子序列)
現在,讓我們談談如何編寫移動演算法.這部分稍微複雜一些.
與執行 JavaScript 相比,DOM 操作的成本要高得多,所以我們希望盡可能減少不必要的移動次數.
這就是我們使用"最長遞增子序列"(LIS)演算法的地方.
這個演算法在陣列中找到最長的遞增子序列.
遞增子序列是元素按遞增順序排列的子序列.
例如,給定以下陣列:
[2, 4, 1, 7, 5, 6]有幾個遞增子序列:
[2, 4]
[2, 5]
.
.
[2, 4, 7]
[2, 4, 5]
.
.
[2, 4, 5, 6]
.
.
[1, 7]
.
.
[1, 5, 6]
這些是元素遞增的子序列.最長的一個是"最長遞增子序列".
在這種情況下,[2, 4, 5, 6] 是最長遞增子序列.在 Vue 中,對應於 2,4,5 和 6 的索引被視為結果陣列(即 [0, 1, 4, 5]).
順便說一下,這裡是一個示例函式:
function getSequence(arr: number[]): number[] {
  const p = arr.slice()
  const result = [0]
  let i, j, u, v, c
  const len = arr.length
  for (i = 0; i < len; i++) {
    const arrI = arr[i]
    if (arrI !== 0) {
      j = result[result.length - 1]
      if (arr[j] < arrI) {
        p[i] = j
        result.push(i)
        continue
      }
      u = 0
      v = result.length - 1
      while (u < v) {
        c = (u + v) >> 1
        if (arr[result[c]] < arrI) {
          u = c + 1
        } else {
          v = c
        }
      }
      if (arrI < arr[result[u]]) {
        if (u > 0) {
          p[i] = result[u - 1]
        }
        result[u] = i
      }
    }
  }
  u = result.length
  v = result[u - 1]
  while (u-- > 0) {
    result[u] = v
    v = p[v]
  }
  return result
}
我們將使用這個函式從 newIndexToOldIndexMap 計算最長遞增子序列,並基於此,我們將使用 insertBefore 插入其他節點.
具體示例
這裡有一個具體的示例來讓它更容易理解.
讓我們考慮兩個 VNode 陣列,c1 和 c2.c1 表示更新前的狀態,c2 表示更新後的狀態.每個 VNode 都有一個 key 屬性(實際上,它包含更多資訊).
c1 = [{ key: 'a' }, { key: 'b' }, { key: 'c' }, { key: 'd' }]
c2 = [{ key: 'a' }, { key: 'b' }, { key: 'd' }, { key: 'c' }]
首先,讓我們基於 c2 生成 keyToNewIndexMap(key 到 c2 中索引的映射). ※ 這是之前介紹的程式碼.
const keyToNewIndexMap: Map<string | number | symbol, number> = new Map()
for (i = 0; i <= e2; i++) {
  const nextChild = (c2[i] = normalizeVNode(c2[i]))
  if (nextChild.key != null) {
    keyToNewIndexMap.set(nextChild.key, i)
  }
}

// keyToNewIndexMap = { a: 0, b: 1, d: 2, c: 3 }
接下來,讓我們生成 newIndexToOldIndexMap. ※ 這是之前介紹的程式碼.
// 初始化

const toBePatched = c2.length
const newIndexToOldIndexMap = new Array(toBePatched) // 新索引到舊索引的映射
for (i = 0; i < toBePatched; i++) newIndexToOldIndexMap[i] = 0

// newIndexToOldIndexMap = [0, 0, 0, 0]// 執行補丁並生成用於移動的 newIndexToOldIndexMap
// 基於 e1(舊長度)的循環
for (i = 0; i <= e1; i++) {
const prevChild = c1[i]
newIndex = keyToNewIndexMap.get(prevChild.key)
if (newIndex === undefined) {
// 如果在新陣列中不存在,卸載它
unmount(prevChild)
} else {
newIndexToOldIndexMap[newIndex] = i + 1 // 形成映射
patch(prevChild, c2[newIndex] as VNode, container) // 執行補丁
}
}
// newIndexToOldIndexMap = [1, 2, 4, 3]然後,從獲得的 newIndexToOldIndexMap 中獲取最長遞增子序列(新實現從這裡開始).
const increasingNewIndexSequence = getSequence(newIndexToOldIndexMap)
// increasingNewIndexSequence = [0, 1, 3]j = increasingNewIndexSequence.length - 1
for (i = toBePatched - 1; i >= 0; i--) {
const nextIndex = i
const nextChild = c2[nextIndex] as VNode
const anchor =
nextIndex + 1 < l2 ? (c2[nextIndex + 1] as VNode).el : parentAnchor // ※ parentAnchor 暫時可以認為是參數中接收到的 anchor。
if (newIndexToOldIndexMap[i] === 0) {
// newIndexToOldIndexMap 的初始值是 0,所以如果是 0,則判斷為不存在到舊元素的映射,即是新元素。
patch(null, nextChild, container, anchor)
} else {
// 如果 i 和 increasingNewIndexSequence[j] 不匹配,則進行移動
if (j < 0 || i !== increasingNewIndexSequence[j]) {
move(nextChild, container, anchor)
} else {
j--
}
}
}讓我們實現它.
現在我們已經詳細解釋了方法,讓我們實際實現 patchKeyedChildren.以下是步驟總結:
- 準備用於桶接力的
anchor(用於在move中插入). - 基於
c2創建 key 和索引的映射. - 基於 key 映射創建
c2和c1中索引的映射. 在這個階段,在基於c1和基於c2的循環中執行補丁過程(不包括move). - 基於步驟 3 中獲得的映射找到最長遞增子序列.
- 基於步驟 4 中獲得的子序列和
c2執行move.
你可以參考原始 Vue 實現或 chibivue 實現作為指導.(我建議在跟隨的同時閱讀原始 Vue 實現.)