組件 Props
開發者介面
讓我們從 props 開始.
讓我們思考一下最終的開發者介面.
讓我們考慮將 props 作為 setup 函式的第一個參數傳遞.
const MyComponent = {
  props: { message: { type: String } },

  setup(props) {
    return () => h('div', { id: 'my-app' }, [`message: ${props.message}`])
  },
}

const app = createApp({
  setup() {
    const state = reactive({ message: 'hello' })

    const changeMessage = () => {
      state.message += '!'
    }

    return () =>
      h('div', { id: 'my-app' }, [
        h(MyComponent, { message: state.message }, []),
      ])
  },
})
實現
基於此,讓我們思考一下我們想在 ComponentInternalInstance 中擁有的資訊.
我們需要指定為 props: { message: { type: String } } 的 props 定義,以及一個實際保存 props 值的屬性,所以我們添加以下內容:
export type Data = Record<string, unknown>

export interface ComponentInternalInstance {
  // .
  // .
  // .
  propsOptions: Props // 保存像 `props: { message: { type: String } }` 這樣的物件

  props: Data // 保存從父組件傳遞的實際資料(在這種情況下,它將是像 `{ message: "hello" }` 這樣的東西)
}
創建一個名為 ~/packages/runtime-core/componentProps.ts 的新檔案,內容如下:
export type Props = Record<string, PropOptions | null>

export interface PropOptions<T = any> {
  type?: PropType<T> | true | null
  required?: boolean
  default?: null | undefined | object
}

export type PropType<T> = { new (...args: any[]): T & {} }
在實現組件時將其添加到選項中.
export type ComponentOptions = {
  props?: Record<string, any> // 添加
  setup?: () => Function
  render?: Function
}
當使用 createComponentInstance 生成實例時,在生成實例時將 propsOptions 設定到實例中.
export function createComponentInstance(
  vnode: VNode
): ComponentInternalInstance {
  const type = vnode.type as Component;

  const instance: ComponentInternalInstance = {
    // .
    // .
    // .
    propsOptions: type.props || {},
    props: {},
讓我們思考如何形成 instance.props.
在組件掛載時,根據 propsOptions 過濾 vnode 持有的 props.
使用 reactive 函式將過濾後的物件轉換為響應式物件,並將其分配給 instance.props.
在 componentProps.ts 中實現一個名為 initProps 的函式來執行這一系列步驟.
export function initProps(
  instance: ComponentInternalInstance,
  rawProps: Data | null,
) {
  const props: Data = {}
  setFullProps(instance, rawProps, props)
  instance.props = reactive(props)
}

function setFullProps(
  instance: ComponentInternalInstance,
  rawProps: Data | null,
  props: Data,
) {
  const options = instance.propsOptions

  if (rawProps) {
    for (let key in rawProps) {
      const value = rawProps[key]
      if (options && options.hasOwnProperty(key)) {
        props[key] = value
      }
    }
  }
}
在掛載時實際執行 initProps,並將 props 作為參數傳遞給 setup 函式.
const mountComponent = (initialVNode: VNode, container: RendererElement) => {
    const instance: ComponentInternalInstance = (initialVNode.component =
      createComponentInstance(initialVNode));

    // init props
    const { props } = instance.vnode;
    initProps(instance, props);

    const component = initialVNode.type as Component;
    if (component.setup) {
      instance.render = component.setup(
        instance.props // 將 props 傳遞給 setup
      ) as InternalRenderFunction;
    }
    // .
    // .
    // .
}export type ComponentOptions = {
props?: Record<string, any>
setup?: (props: Record<string, any>) => Function // 接收 props
render?: Function
}此時,props 應該傳遞給子組件,所以讓我們在遊樂場中檢查它.
const MyComponent = {
  props: { message: { type: String } },

  setup(props: { message: string }) {
    return () => h('div', { id: 'my-app' }, [`message: ${props.message}`])
  },
}

const app = createApp({
  setup() {
    const state = reactive({ message: 'hello' })

    return () =>
      h('div', { id: 'my-app' }, [
        h(MyComponent, { message: state.message }, []),
      ])
  },
})
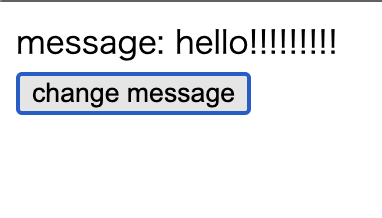
但是,這還不夠,因為當 props 更改時渲染不會更新.
const MyComponent = {
  props: { message: { type: String } },

  setup(props: { message: string }) {
    return () => h('div', { id: 'my-app' }, [`message: ${props.message}`])
  },
}

const app = createApp({
  setup() {
    const state = reactive({ message: 'hello' })
    const changeMessage = () => {
      state.message += '!'
    }

    return () =>
      h('div', { id: 'my-app' }, [
        h(MyComponent, { message: state.message }, []),
        h('button', { onClick: changeMessage }, ['change message']),
      ])
  },
})
要使此組件工作,我們需要在 componentProps.ts 中實現 updateProps 並在組件更新時執行它.
~/packages/runtime-core/componentProps.ts
export function updateProps(
  instance: ComponentInternalInstance,
  rawProps: Data | null,
) {
  const { props } = instance
  Object.assign(props, rawProps)
}
~/packages/runtime-core/renderer.ts
const setupRenderEffect = (
    instance: ComponentInternalInstance,
    initialVNode: VNode,
    container: RendererElement
  ) => {
    const componentUpdateFn = () => {
      const { render } = instance;
      if (!instance.isMounted) {
        const subTree = (instance.subTree = normalizeVNode(render()));
        patch(null, subTree, container);
        initialVNode.el = subTree.el;
        instance.isMounted = true;
      } else {
        let { next, vnode } = instance;

        if (next) {
          next.el = vnode.el;
          next.component = instance;
          instance.vnode = next;
          instance.next = null;
          updateProps(instance, next.props); // 這裡
如果螢幕更新了,那就沒問題.
現在,您可以使用 props 將資料傳遞給組件!做得很好!

到此為止的原始碼:
chibivue (GitHub)
作為附註,雖然這不是必需的,但讓我們實現接收 kebab-case props 的能力,就像原始 Vue 中一樣.
此時,創建一個名為 ~/packages/shared 的目錄,並在其中創建一個名為 general.ts 的檔案.
這是定義通用函式的地方,不僅適用於 runtime-core 和 runtime-dom.
按照原始 Vue,讓我們實現 hasOwn 和 camelize.
~/packages/shared/general.ts
const hasOwnProperty = Object.prototype.hasOwnProperty
export const hasOwn = (
  val: object,
  key: string | symbol,
): key is keyof typeof val => hasOwnProperty.call(val, key)

const camelizeRE = /-(\w)/g
export const camelize = (str: string): string => {
  return str.replace(camelizeRE, (_, c) => (c ? c.toUpperCase() : ''))
}
讓我們在 componentProps.ts 中使用 camelize.
export function updateProps(
  instance: ComponentInternalInstance,
  rawProps: Data | null,
) {
  const { props } = instance
  // -------------------------------------------------------------- 這裡
  Object.entries(rawProps ?? {}).forEach(([key, value]) => {
    props[camelize(key)] = value
  })
}

function setFullProps(
  instance: ComponentInternalInstance,
  rawProps: Data | null,
  props: Data,
) {
  const options = instance.propsOptions

  if (rawProps) {
    for (let key in rawProps) {
      const value = rawProps[key]
      // -------------------------------------------------------------- 這裡
      // kebab -> camel
      let camelKey
      if (options && hasOwn(options, (camelKey = camelize(key)))) {
        props[camelKey] = value
      }
    }
  }
}
現在您應該也能夠處理 kebab-case 了.讓我們在遊樂場中檢查它.
const MyComponent = {
  props: { someMessage: { type: String } },

  setup(props: { someMessage: string }) {
    return () => h('div', {}, [`someMessage: ${props.someMessage}`])
  },
}

const app = createApp({
  setup() {
    const state = reactive({ message: 'hello' })
    const changeMessage = () => {
      state.message += '!'
    }

    return () =>
      h('div', { id: 'my-app' }, [
        h(MyComponent, { 'some-message': state.message }, []),
        h('button', { onClick: changeMessage }, ['change message']),
      ])
  },
})